Stay on top of warehouse operations. Set up an email to arrive at a specified time with detailed information about warehouse activity. This is done with Subscriptions. Subscriptions are based on smart filters. A subscription is an email alert with filtered results.

For example, if you created a smart filter to display orders over $500, you could subscribe to that smart filter every day at 2:00 pm. An email would arrive in your inbox every day at 2:00 with the smart filter results.
When you receive a subscription in your email, the email will contain the record(s) that meet the filtered search criteria as well as a link to the table with the smart filter applied and a download button to download the data to Excel.
Pro Tip: The table view in the email will display the default column display for that table.
Create a Subscription
- Access the Manage Smart Filters screen.
From within a table, select Smart Filters > Manage Smart Filters; or
From a page displaying the Favorite Smart Filters section, click the gear icon ( ) next to the section and select Manage Smart Filters.
 - Locate the smart filter that you want to subscribe to, and click the number that appears next to the smart filter in the Subscription column. A popup displays.
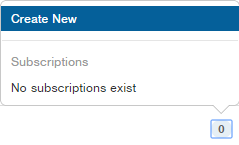
- Select Create New. The Create Subscription window appears.
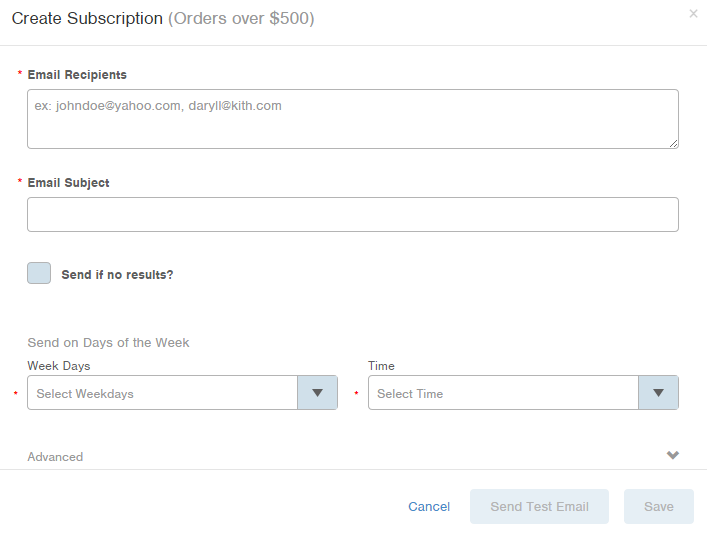
- Enter the Email Recipients.
- Enter an Email Subject.
- If you want to receive an alert even if the smart filter contains no results, click the Send if no results? Checkbox.
- Select the Week Days you would like to receive the email.
- Select the Time you would like to receive the email.
- For Advanced options, click the Advanced drop-down arrow (
 ). Advanced options allow you to select days within a month to receive the email (i.e., on the 15th of every month at 2:00 pm).
NOTE: If you expand the Advanced section, you will need to click the right arrow ( ) to collapse the section before moving on.
 - If you would like to send a test email, click the Send Test Email button.
- When finished, click Save. A number will now display in the Subscriptions column next to the smart filter.
Edit or Cancel a Subscription
- Access the Manage Smart Filters screen.
From within a table, select Smart Filters > Manage Smart Filters; or
From a page displaying the Favorite Smart Filters section, click the gear icon ( ) next to the section and select Manage Smart Filters.
 - Locate the smart filter whose subscription you want to edit or delete, and click the number that appears next to the smart filter in the Subscriptions column. A popup displays.
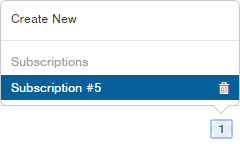
- To edit the subscription, click on the subscription name (i.e., subscription #5). The edit window opens. Make the necessary edits and click Save.
To cancel a subscription, rest your mouse on the subscription name and click the trash can icon ( ) that appears to the right of the name. The subscription is deleted.