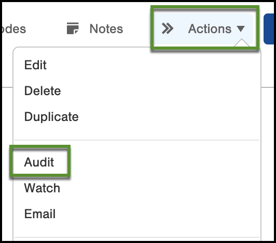
The audit table is one of the best tools available in Infoplus. It logs all the information about any actions that occur to a record in Infoplus. There are two ways to access the Audit Table:
1. Go directly to the Audit Table (use the period key to quickly navigate to the Audit Table) and then search for the record in question.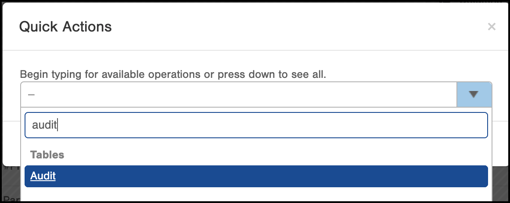
The Audit Table is a great first step if you experience something unexpected or something is not working the way you thought it would in Infoplus.
This article includes a couple of Use Cases that detail some common ways to utilize the Audit table to help you uncover more information about what is going on in Infoplus.
Use Case:
An order was successfully imported into Infoplus, had the Infoplus Tag in Shopify, and the Order created a Shopping Cart Connection Log saying it was imported. However, the Order is nowhere to be found on the Order Table. Where could it be?
Solution:
In cases like this, we recommend using the Audit table.
- Take the Infoplus Order number from the Shopify Infoplus Tag or the Shopping Cart Connection Log
- Use the filter “Record Type” and set it to “Order”
- Use the filter “Event Date” and set it to the date the Order should’ve imported into Infoplus
- Use the filter “Record” and put the Infoplus Order Number
There is a good chance that this will narrow down the search in the Audit table and you will be able to see what happened to the Order, whether it was deleted by a user, deleted by the system, or any other scenarios that may have happened.
Use Case:
How can I see if any Orders have been deleted out of Infoplus and by what user?
Solution:
- Go to the Audit Table
- Use the filter “Record Type” and set it to “Order”
- Use the filter “Description” and set it to “Contains: Delete”
- Use a Smart Filter to ‘Save’ for future references
Additionally, you could set up the Smart Filter into a User Report and have it emailed directly to your inbox daily to help you monitor Orders in your Infoplus.