Warning: Only bulk load in batches of 4,000 or less. An Infoplus best practice is to perform large bulk edits and/or loads outside of peak business hours, as Bulk Loading can add additional strain to the system.
Bulk Load Quick Adjustments
- Access the "Quick Adjustment" table. Two methods:
- From the Dashboard: Click the “Warehouse Operations” tab, click the “Inventory Management” App, then click the “Quick Adjustment” Table.
- From the Quick Actions shortcut: Press a dot (period) on your keyboard, then select “Quick Adjustment” from the list of Quick Actions - Select the Warehouse that will receive the Bulk Load.

- Click the Actions button and select Bulk Load. The Bulk Load window will appear. The Progress Indicator at the top right will show the steps currently active.

NOTE: When working through the Bulk Load process, clicking the Browser Back button will cancel the Bulk Load and return the user to the Quick Adjustment table.
To see a list of the Required Fields for bulk load, click the Required Fields link. To download a template containing a column for all required fields, click the Download template file link. 
4. Either drag and drop the file to be uploaded onto the icon or click the Select File link to select a file on your computer. After selecting the file, click Next. (Acceptable file formats include Comma Separated Value (.CSV) and Excel Spreadsheet (.XLSX)
5. Work through each field from top to bottom, consider the different mapping options, and make the proper selections for the file uploaded.  Field Column: The Field column holds both required fields as well as the fields from the uploaded document (step 4). A column with an Asterisks (*) indicates a required field.
Value Column:
Column From File (First Row)
- Select the column from the source file that should be mapped to the Location field on the left. If a field in the source file has a similar name to the required field, it will automatically be selected. If the column header on the uploaded file is different, there is the option to override any automatic selections if necessary.
Default Value (Second Row)
- If the source file does not contain column information that needs to be uploaded, the column is blank, or there is a need to override existing values in the source file, select the 'Default Value' option for that column. For example, if the Adjustment Code is 'Customer Audit' for every record being uploaded, select a Default Value from the list of preloaded values.
Dropdown Fields (Third Row)
Select the correct value for the dropdown field based on the uploaded document. Use the 'Preview Values' button to review the selected value.
Map Values (Fourth column containing checkboxes)
- The Map Values checkbox allows you to connect values from the source file to values in Infoplus. For example, if the upload file displays the Adjustment Code of 'Customer Audit' as 'Audit' in your data source. Infoplus won't recognize that Adjustment Code, so it will automatically upload that information. To avoid having to edit the source file to match what Infoplus wants, connect the uploaded value to the Infoplus value. After clicking Next, a screen will be displayed to allow mapping each record to the value necessary.
NOTE: You cannot select to map the column AND select a Default Value. To 'unmap' a column, click the X next to the field name in the 'Column From Your File' section.
Add any additional fields necessary by selecting the 'Add Optional Field' button in the lower left corner. The following popup will display.
6. After making all the mapping selections, click Next. If you have selected any of the Map Values checkboxes, a Map Values screen will appear for each checkbox selected. From the drop-down menu(s), select the appropriate Infoplus value(s) for each source file value. Here’s an example of the Map Values screen for the Adjustment Code field (destination value mapping already applied):
In the above example, the source file contains an Adjustment Code of 'Audit'. This entry does not match the value options in Infoplus, so we have mapped this value to an Infoplus value. When Infoplus encounters a value of 'Audit', it will know to use 'Customer Audit' as the value. Map Values has a field limit of 100. At that point, please review the spreadsheet and make the adjustments to the uploaded document.
7. After making any Map Values selections (if required), click Next. The Review screen will appear. 
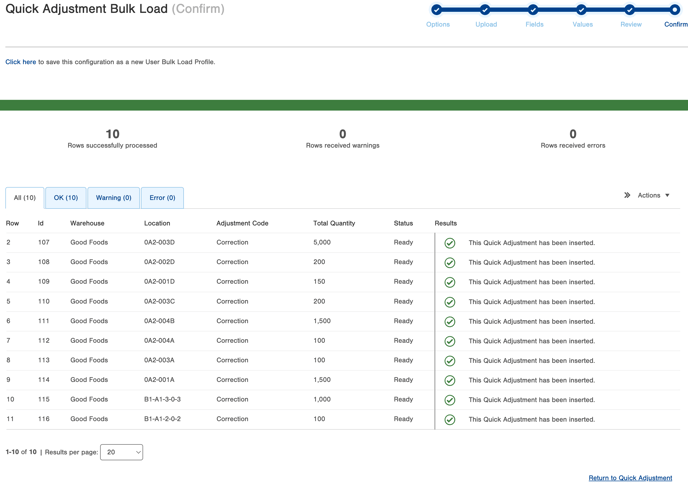
9. The upload is complete. The Quick Adjustment records have been created, but the adjustments have not yet been executed. The location will not yet reflect the adjusted inventory. See how to Execute Quick Adjustments at the bottom of the 'How to Create Quick Adjustments' for detailed instructions.
