Create / Edit Multiple Locations Using the Location Builder
To create multiple locations with similar attributes (i.e., all locations in an Aisle), use the Location Builder.
NOTE: The Location Builder will only build new locations. If a location has already been built based on your setup parameters, the location will not be built again.
To use the Location Builder, you will need to have identified all components you want to use in the location, such as:
- Buildings (if used)
- Zones (if used)
- Aisles (if used)
- Location Billing Type
- Location Footprint
- Location Address Schemes
NOTE: There may be some predefined components already loaded into Infoplus.
Here’s an example of selections in the Location Builder Setup screen:
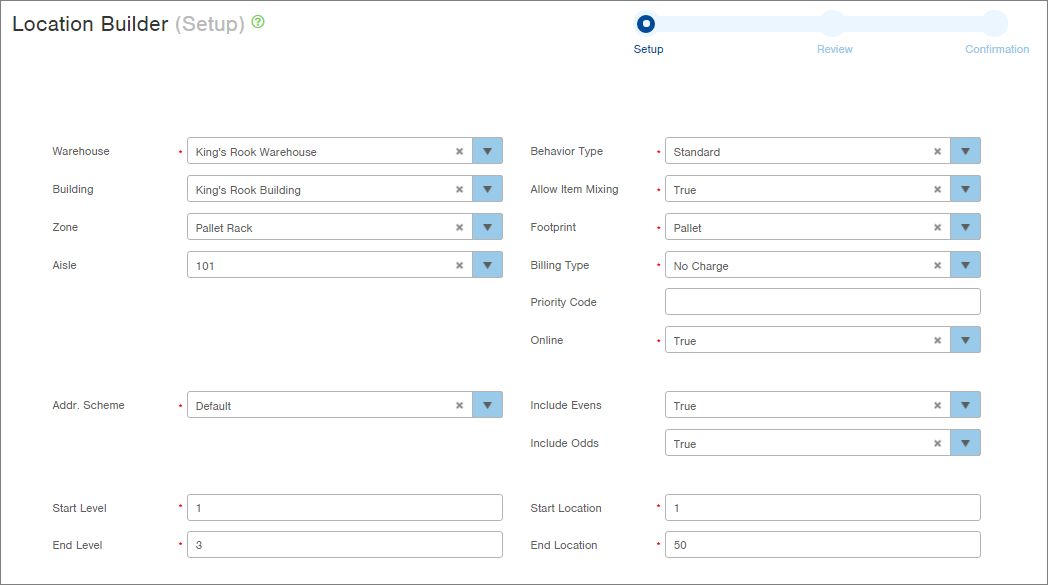
The above selections will create 150 locations (all even and odd locations from 1 to 50 on 3 levels).
Note: When selecting an Address Scheme, the Minimum Number of Digits field in that scheme is a required field to use the Location Builder tool. If the Minimum Number of Digits field does not have a value, the below generic error will display.

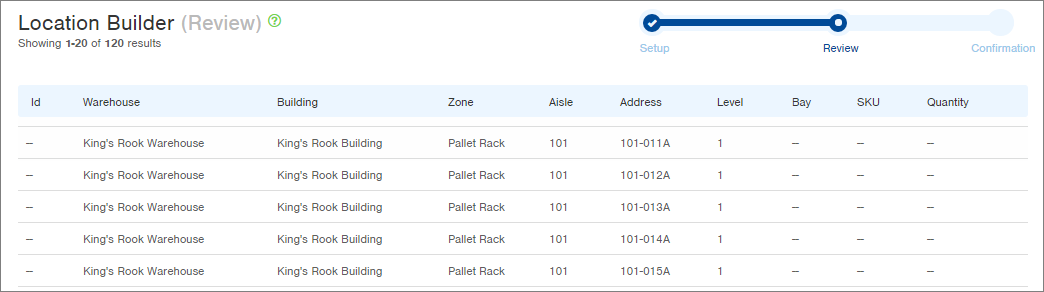
The Review screen displays the locations that will be built. (NOTE: The screenshot below is only a small portion of the Review screen.)
Create Multiple Locations:
- Access the “Location Builder” Process. Two methods:
From the Dashboard: Click the “Warehouse Operations” tab, click the “Warehouse Setup” App, then click the “Location Builder” Process.
From the Quick Actions shortcut: Press a dot (period) on your keyboard, then select “Location Builder” from the list of Quick Actions.
The Setup step in the Location Builder process appears.
- Select the Warehouse for the locations. NOTE: You must select a Warehouse before Infoplus knows which zones and aisles to make available.
- Select the Building containing the locations, if applicable (i.e., Building 1).
- Select the Zone containing the locations, if applicable (i.e., Pallet Rack).
- Select the Aisle containing the locations.
- Select the Address Scheme whose format you want to use to build location addresses. See Create Location Address Schemes for information on building address schemes.
- In the Start Level and End Level fields, indicate how many levels of location addresses are to be built. For example, if all locations are floor locations, enter a starting and ending level of 1. If you have three levels of racks, enter a start level of 1 and an end level of 3. NOTE: If you use letters to represent levels, you will still need to type numbers into these fields; however, Infoplus will convert them accordingly (i.e. 1 = A, 2 = B).
- If you use Bays (i.e., the area between crossbars in an Aisle), indicate a Start Bay and End Bay.
- Select a Behavior Type for this location assignment, if applicable. Behavior types are created by the system and are used to set rules about what can be done at a location.
 For example, assigning a behavior type of “Pallet” means only pallets can be placed and removed from that location. Here are the available behavior types:
- Forward Each or Forward Case represents floor-level locations that provide easy access.
- Standard is a generic behavior type.
- Case only full cases of goods can be used in a location.
- Pallet only those that can be used in a location.
- Non-pickable the product cannot be directly picked from this location.
- LPN 'License Plate Number' and serves as a temporary location.
- Holding cannot be used for allocation.
When the “Holding” behavior type is selected, “Allow Item Mixing” is automatically set to “True”.
When inventory is received into a “Holding” location, it is counted towards “On Hand” quantity but has an “Unavailable” status.
Receiving into a “Holding” location ignores “Lot Mixing Rules” and “Item Mixing Rules” on Item records (i.e, multiple different items can be stored together even if their “Item Mixing Rule” is “Single,” and multiple items from different item receipts can be stored together even if their “Lot Mixing Rule” is “Item Receipt”) - In the Allow Item Mixing field, select True or False. True indicates that different SKUs can be stored in each location. False indicates that only one SKU can be stored in each location. See Overview of Lot and Item Mixing Rules for more information.
- Select a Footprint for the locations. The footprint is the name given to the dimensions of the location.
- Select a Billing Type for the locations (i.e., pallet, shelf, bin). Billing types can be used to assign a cost to the storage of an item. Warehouses that bill customers for storage often use this field.
- Specify whether to include Evens, Odds, or both location numbers in the locations you are building by selecting True in the appropriate field.
- For example, if you are only building locations for the right side of the aisle, and only even location numbers are used on that side, select True in the “Include Evens” field. You can leave the “Include Odds” field blank or select “False.” If you want odd and even location numbers, select True in both fields.
- You must select True in at least one of these fields in order to build locations. - If you want to assign a Priority Code to each location, enter the code into the Priority Code field.
- In the Start Location and End Location fields, specify the range of location numbers to be created. For example, if you have levels with 50 locations per level, enter a starting location of 1 and an ending location of 50.
- Click Next. The Review screen appears.
- Review the locations that will be built, and click Next. The locations will be built.
- Click Done. These locations will now be displayed in the “Locations” table.
