A Replenishment Plan is a predefined plan for replenishing a group of Pick Face Assignments. A Replenishment Plan allows you to quickly create replenishment processes.
To create a Replenishment Plan, you need to have created a filtered list of Pick Face Assignments. For example, if you replenish all Down Forward pick face locations that have a Behavior Type of "Forward Each" twice a day, create a smart filter to show those locations (i.e., Location Address > Starts with > S DF and Behavior Type = Forward Each). Then create a Replenishment Plan for these filtered locations that you can easily run at any time throughout the day.
How to Create a Replenishment Plan
NOTE: You need to have already created the Pick Face Assignment smart filter to be used by the Replenishment Plan before you can create the plan. See Create / Manage Smart Filters for help.
- Access the "Replenishment Plan" table. Two methods:
From the Dashboard: Click the “Warehouse Operations” tab, click the “Replenishments” App, then click the "Replenishment Plan” Table.
From the Quick Actions shortcut: Press a dot (period) on your keyboard, then select “Replenishment Plan” from the list of Quick Actions. -
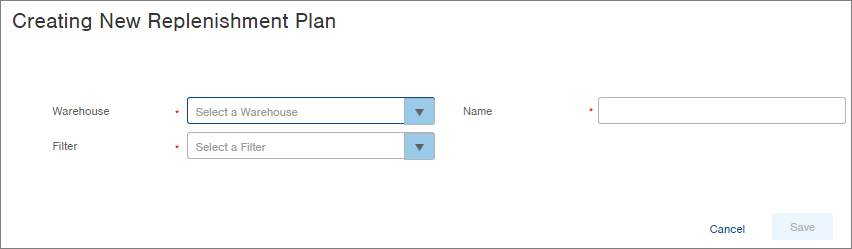
Click the Create New button in the top right. The "Creating New Replenishment Plan" screen appears.
-
Select the Warehouse containing the Pick Face Assignments to be replenished.
-
Select the Smart Filter that contains the Pick Face Assignments you want to replenish with this plan.
-
Enter a Name for the Replenishment Plan (i.e., South - Forward Each Replenishment Plan).
-
Click Save.
NOTE: To edit a Replenishment Plan, click on the plan in the Replenishment Plan table and then click the Edit button in the bottom right.
How to Run a Replenishment Plan
- Access the "Replenishment Plan" table. (See instructions above.)
- Click on the Replenishment Plan you want to run. The Replenishment Plan will open.
- Click the Next Steps button and select Run Replenishment Plan.
- Review the Results column for each Pick Face Assignment to see whether a replenishment will be created. NOTE: You may see warnings and errors based on inventory available or other open replenishment processes.
- Click Submit. All replenishments that could be created will be processed. This process creates the Pick and Put Away work tickets for replenishment.
- If you want to print the work tickets associated with the replenishment processes you just created, click the Next Steps button and select Print Work Tickets. Click the Download Report button to download a PDF file containing all of the work tickets.
NOTE: You can also print work tickets from the Work table. See How to Generate Work Tickets.
