How to Create and Print a Bill of Lading
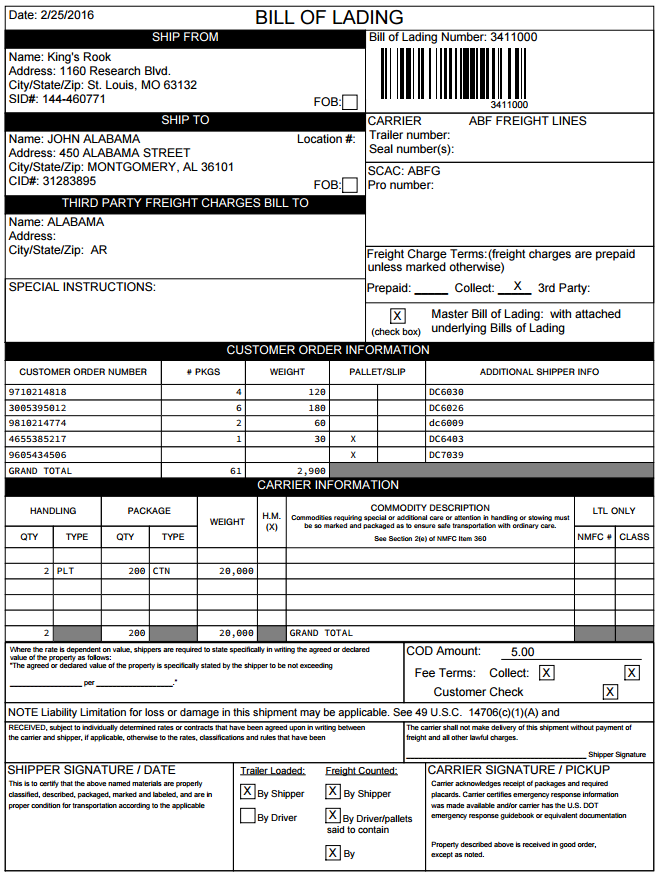
A Bill of Lading (BOL) provides the driver and the carrier with details needed to process a freight shipment and properly invoice for the shipment. The BOL acts as a receipt and a contract.
- The BOL shows that the carrier has received goods as described and is obligated to deliver the freight in good condition to the person consigning for the goods.
- The document indicates where the shipment is going, the inventory count, how it's billed, and how it's to be handled on the dock and trailers.
- BOLs are used for non parcel shipments in Infoplus (e.g. LTL/Less than Truckload, TL/a full Truck Load).
- Infoplus's Bill of Lading is in-line with the industry standard GS1 (Global Standards One) / VICS (Volulntary Inter-Industry Commerce Standards) format.
Create a Bill of Lading
- Access the "Bill of Lading" table. Two ways:
From the Dashboard: Click the “Warehouse Operations” tab, click the “Fulfillment” App, then click the “Bill of Lading” Table.
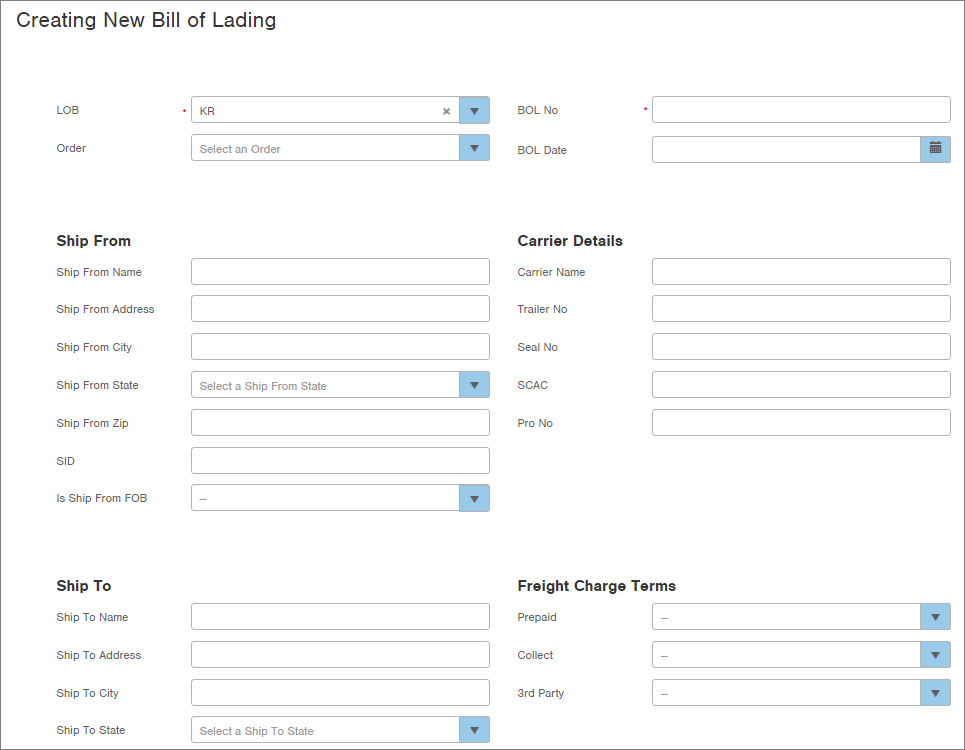
From the Quick Actions shortcut: Press a dot (period) on your keyboard, then select “Bill of Lading” from the list of Quick Actions. - Click the Create New button in the top right. The "Creating New Bill of Lading" screen appears.
-
Select the Line of Business containing the non-parcel orders to be shipped.
-
If you are creating a BOL for a particular order, select the Order. After selecting an Order, other fields in the screen will complete based on the selected order. For example, the BOL No field will use the order number to assign a BOL number, but it can be edited.
NOTE: An example of when you might create a BOL and NOT select an order is when shipping supplies from one warehouse to another. You can create a Master BOL to group several shipments together on one truck. -
Enter the BOL Number for the shipment. The BOL Number is an identification number assigned by the shipper based on GS1 global identification standards.
-
In the BOL Date field, select the date of this BOL.
Ship From
-
In this section, indicate where the shipment is originating. Name and address details will auto-fill if an order is selected.
- SID is the Shipment ID. This may be used to document if a number is applied by the shipper to this shipment.
- Is Ship from FOB is a true/false field. True indicates that the FOB (Free On Board) is based on the Ship From address. Free On Board is the point at which the title of the goods passes from the shipper to the consignee.Carrier Details
-
Enter information for the Carrier that will transport the shipment. Carrier name will auto-fill if an order is selected.
- Trailer No: Used if a truckload carrier hauls the shipment.
- Seal No: Used if the shipment is a full truckload from the origin to destination.- SCAC (Standard Carrier Alpha Code): The four-letter alpha code identifying the carrier as assigned by the NMFTA (National Motor Freight Traffic Association).
- Pro No: Used if an LTL (Less than Truckload) carrier hauls the shipment.
Ship To
-
Indicate where the shipment is going. Name and address details will auto-fill if an order is selected.
- Ship To Location No: The number assigned to consignee’s ship to address.- CID (Consignee Identification Number): A number assigned to the shipment by the customer and required for scheduling, tracking and/or receipt. Examples would be appointment numbers, collect move authorization numbers, etc.
- Is Ship to FOB is a true/false field. True indicates that the FOB (Free On Board) is based on the Ship To address. Free On Board is the point at which the title of the goods passes from the shipper to the consignee.
Freight Charge Terms
-
Indicate how the freight is being paid for.
- Prepaid: The shipper pays for the freight costs from origin to the consignee’s dock.
- Collect: The consignee pays for the freight costs from the shipper’s door to their door.
- 3rd Party: The freight charges for a shipment are paid by a party other than the shipper or consignee.
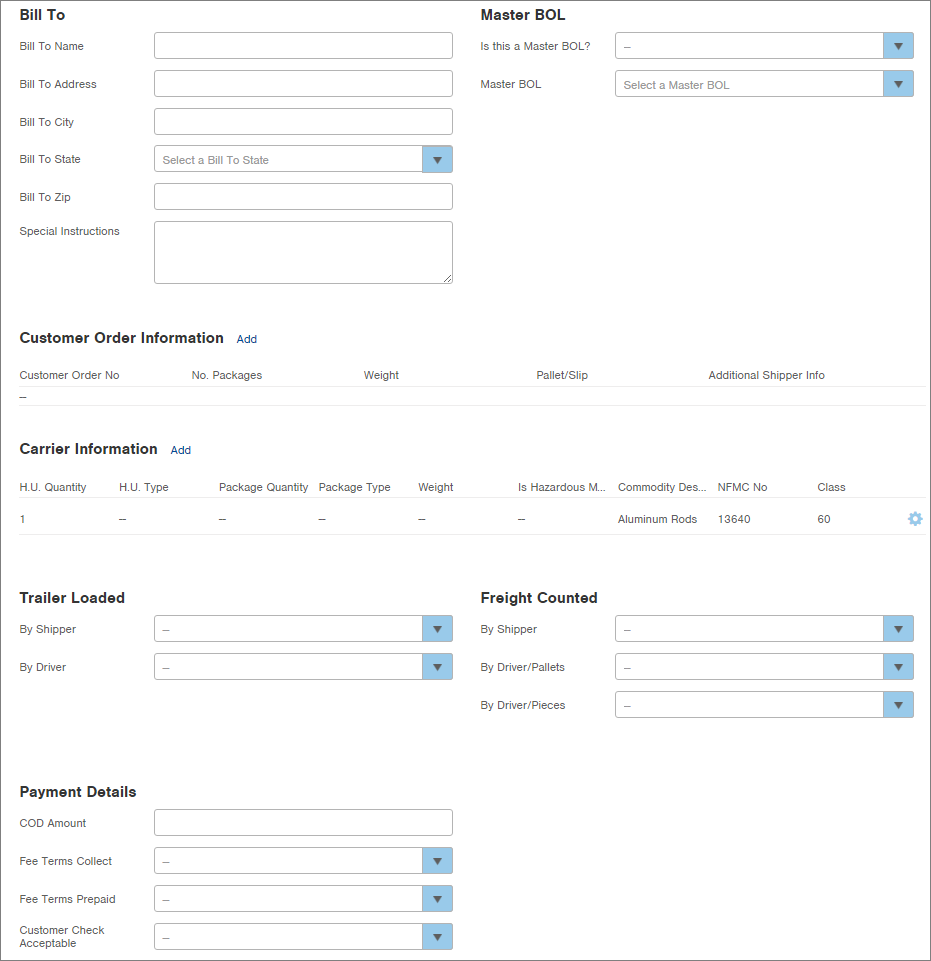
Here is a screenshot of fields further down the screen:
Bill To
-
Indicate who the shipment should be billed to.
Master BOL
-
In the Is this a Master BOL? field, select True or False. If a Master BOL is required, select True. If leaving the field blank, it defaults to False.
-
If you selected False in the field above, and want to tie this BOL to a Master BOL, select the Master BOL.
Customer Order Information (SEE NOTE BELOW)
-
If you want to indicate detailed Customer Order information, click the Add link. Enter the necessary information and click OK.
NOTE: Some fields will auto-fill if an order was selected above.- Customer Order No: The number generated by the customer to identify the order.
- No. Packages: The number of individual packages or cartons on the shipment.
- Weight: The weight of all the packages by Customer Order Number (excluding the weight of pallets/Slip Sheets).
- Pallet/Slip: Indicates whether the product is unitized (i.e. pallets or slips).
- Additional Shipper Info: Any other information requested by the customer. This space may also be used to document “special instructions” if additional space is needed.
Carrier Information (SEE NOTE BELOW) -
To enter additional details about the shipment, click the Add link. Enter the necessary information and click OK. These are the details about the actual shipment, total cartons or what type of shippable unit (tank, roll etc), total pallets, weight, hazardous goods, class of goods.
NOTE: Some fields will auto-fill if an order was selected above.
- H.U. Quantity: The number of Handling Units listed by commodity type.
- H.U. Type: The type of handling unit (e.g., pallets, slips, cartons, bundles, rolls, drums).
- Package Quantity: The number of packages or cartons listed by commodity type. The total number of packages should equal the total in the Customer Order Information section.
- Package Type: The type of package (e.g., cartons, bundles, rolls, drums).
- Weight: The weight of the handling units (includes the weight of pallets, slip sheets, etc.).
- Is Hazardous Material: True or False selection indicating if the product shipped is classified as Hazardous Material.
- Commodity Description: The general product description as listed in the NMFC (National Motor Freight Classification).
- NFMC No: The NMFC number tied to the commodity classification.
- Class: The freight class of the commodity as classified by the NMFC.
NOTE ABOUT THE "CUSTOMER ORDER INFORMATION" AND "CARRIER INFORMATION" SECTIONS:
It is preferred that all Bill of Lading information be contained in one page; however, if you have more than 5 records to add to the "Customer Order Information" or "Carrier Information" sections, the BOL will contain additional page (or pages). The GS1 recommendation is that when Supplement Pages will be needed, that the first page of the BOL shows GRAND TOTAL information ONLY and all records for that section appear on the Supplement Page. The screenshots below show examples of Page 1 and 2 of a BOL with more than 5 records in the "Customer Order Information" section. The callouts describe what was done in Infoplus to make the BOL display this way.
Page 1 of the BOL: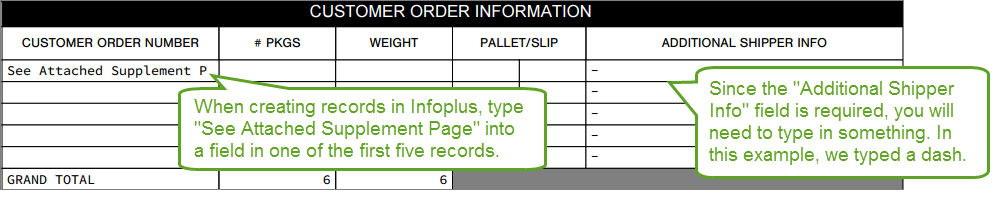 Page 2 of the BOL:
Trailer Load -
Indicate if the trailer was loaded by the Shipper or the Driver. Select True in the appropriate field.
Freight Counted
-
Indicate if the freight was counted by the Shipper or the Driver. And if counted by the Driver, was freight counted in Pallets or Pieces. Select True in the appropriate field.
Payment Details
-
Indicate how the shipment is being paid for.
-
Click Save.
BOL NumberPrint the Bill of Lading
-
While viewing the Bill of Lading record, click the Actions menu, and select Bill of Lading Report.
-
In the Review step of report creation, click Submit.
-
Click Download Report. The BOL will display as a PDF document that you can print.