If you need to move entire locations of inventory, run the “Create Location Move Work” process. For example, if you add a whole new section of shelving and want to move inventory to the new location, run this process.
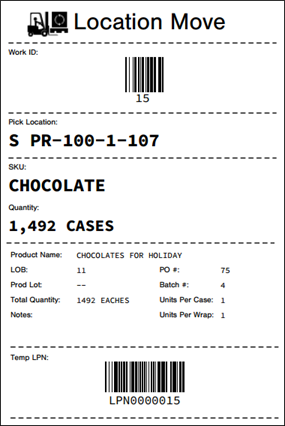
The “Create Location Move Work” process will create “pick” and “put away” work records in the "Work" table which you can then use to print a location move ticket. NOTE: There will only be one ticket for both the “pick” and “put away” work for each location move. When the work ticket is scanned, Infoplus checks the status of the work.
NOTE: When moving an entire location, you should take the location offline to ensure there is no work being processed on the location. To do this, change the location record’s Online field to False. See Create / Edit One Location at a Time.
You can begin the “Create Location Move Work” process from the “Warehouse Setup” app or from within the “Location” table.
To Run the “Create Location Move Work” Process from the "Warehouse Setup" App:
- Access the “Create Location Move Work” process. Two methods:
From the Dashboard: Click the “Warehouse Operations” tab, click the “Warehouse Setup” App, then click the “Create Location Move Work” process.
From the Quick Actions shortcut: Press a dot (period) on your keyboard, then select “Create Location Move Work” from the list of Quick Actions. - From within the “Location” table, select the locations which need to be moved by clicking the checkbox next to each location.
- After making your selections, click Next.
- Review the locations to be moved. If a location is invalid, the reason will display.
- Click Next. Work records will be created for the selected location move(s).
NOTE: Location Move work records will display as two records in the “Work” table (one for “pick” and one for “put away”), but there is only one work ticket for the move. - If you want to print work tickets immediately, click the Next Steps button and select Print Work Tickets. Click the Download Report button to download a PDF of each work ticket.
- Click Done.
NOTE: If you want to print a work ticket later, see Create Work Tickets.
To Access the “Create Location Move Work” Process from within the “Location” Table:
- Access the “Location” table. Two methods:
From the Dashboard: Click the “Warehouse Operations” tab, click the “Warehouse Setup” App, then click the “Location” Table.
From the Quick Actions shortcut: Press a dot (period) on your keyboard, then select “Location” from the list of Quick Actions. - Click the checkbox next to each location to be moved.
- Click the Actions button and select Create Location Move Work.
- Review the locations to be moved. If a location is invalid, the reason will display.
- Click Next. Work records will be created for the selected location move(s).
NOTE: Location Move work records will display as two records in the “Work” table (one for “pick” and one for “put away”), but there is only one work ticket for the move. - If you want to print work tickets immediately, click the Next Steps button and select Print Work Tickets. Click the Download Report button to download a PDF of each work ticket.
- Click Done.
NOTE: If you want to download/print a work ticket later, see Create Work Tickets.
