The standard process that Infoplus uses to create parcel labels with our Manifesting partners relies on data from your Orders, Cartons, Products, Parcel Accounts, and more, combined with a core set of business rules that Infoplus understands.
Infoplus Support can help with general questions about how scripting works. For help with a specific script or its outputs, you will need to submit a Pro Services request for paid support. Pro Service request form can be found here.
However, there are times when you may need to customize the data or business rules that you use to create shipments and parcel labels. For example, some orders may need dry ice added to them based on the products or the order's ship-to address. Or you might have a business rule that says based on the carrier you want to increase or decrease the total weight of a Carton in certain circumstances. Infoplus allows you to customize Manifest calls in cases like these, using Manifest Scripts. Here's how they work.
Create a Manifest Script
To create a Manifest Script, simply navigate to the Script table in Infoplus. Create a new Script, and choose the Script Type of Manifest and the appropriate Manifest Partner (i.e. EasyPost or eHub).
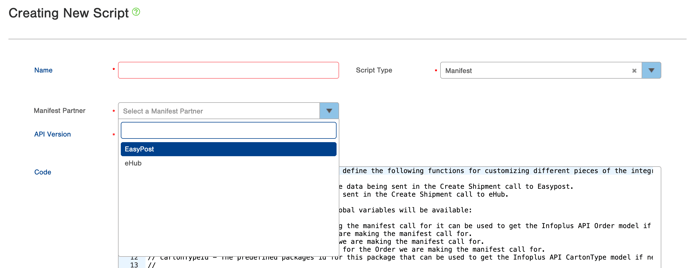
EasyPost
There is a single function that you must define that allows you to customize the data passed to EasyPost when creating shipments and getting rates:
- customizeEasypostPreRatesCall - This function allows you to customize the data being sent in the Create Shipment call to EasyPost. This script will have access to a global variable called shipmentMapForRate, which is a Java Map object (i.e., it has get and put methods). You can modify the data in this map, according to Easypost's shipment API documentation, to change the rates & labels that Infoplus will receive.
- Easypost API documentation: https://www.easypost.com/docs/api#shipments
- Easypost API documentation: https://www.easypost.com/docs/api#shipments
When you create a new Manifest Script, Infoplus will pre-populate the Code field with a comment that describes in more detail the variables and functions available in a Manifest Script.
eHub
When you create a new Manifest Script, Infoplus will pre-populate the Code field with a comment that describes in more detail the variables and functions available in a Manifest Script. For eHub manifest scripts, there is a single function that you can define to customize the data passed to eHub when creating shipments and getting rates:
- customizeEhubCall - This function should allow you to customize the data being sent in the Create Shipment call to eHub.This script will have access to a global variable called shipmentMapForRate, which is a Java Map object (i.e., it has get and put methods). You can modify the data in this map, according to eHub’s shipment API documentation, to change the rates & labels that Infoplus will receive.
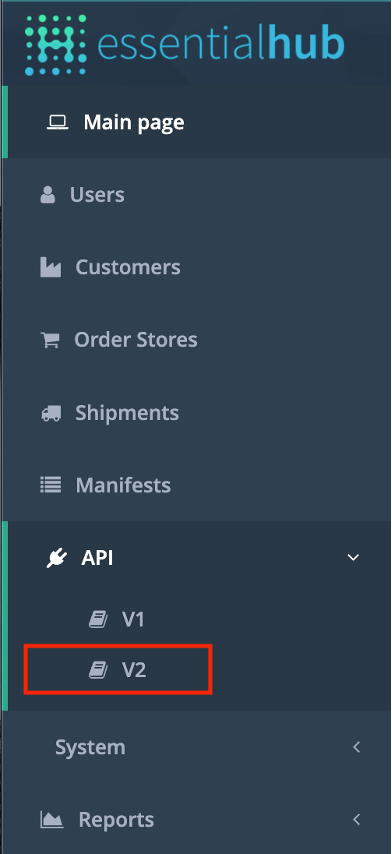
How to access the eHub API documentation:
- Log in to admin.essentialhub.com
- If you do not have a login please reach out to support@ehub.com.
- If this is your first time using eHub, please schedule a call to get your account started.
On the side menu select “API” and then click on “V2”
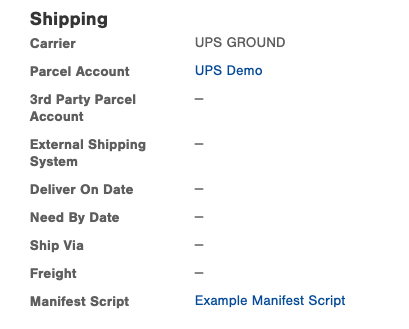
Assigning a Manifest Script to an Order
To use a Manifest Script, it must be applied at the Order level. You can select it when Creating or Editing an Order in Infoplus, with the Manifest Script field on the order table:
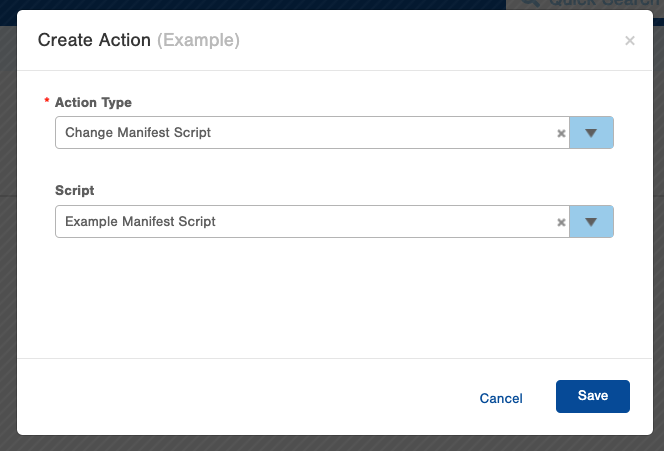
You can also automatically set a Manifest Script on an Order using a Trigger and your User Filter. Add the action of Change Manifest Script and the Manifest Script you would like set on the orders. Read more about Triggers here.
Testing Manifest Scripts
To test a Manifest Script you must create Parcel Labels for a valid Infoplus Order. This can be done in either your test or live site as long as you have Parcel Accounts set up.
We recommend running a Fulfillment Process against a test order, with the Create Labels field set to True. You can edit your script, and use the Run Pick Pack Ship action on your Fulfillment Process to quickly void existing labels for your test orders, and re-create the labels again as needed, providing a quick turn-around cycle for testing changes to the script.
Error Handling
If your Manifest Script produces an error, Infoplus will not be able to complete the process of creating parcel labels. This error will be presented in Infoplus at whatever point a user is trying to create parcel labels (such as when running Fulfillment / Pick Pack and Ship, or at the Ship Station, or from the Create Parcel Labels process).
Example Manifest Scripts
Adding Dry Ice
In this example, this script is applied to Orders that require dry ice to be added to the label.
Note: Some carriers may require that line 16 be changed to: shipmentMapForRate.get('options').put('dry_ice', 'true');
Setting Third-Party Account For International Duties and Tax Charges
By default, an international order with a third-party parcel account assigned to it will have the charges for duties and taxes assigned to the original parcel account, rather than the third party. This can be changed using a Manifest Script by specifying what account should be responsible for these charges. This is currently only possible with FedEx and UPS accounts and how this is specified in the data sent to these carriers differs between the two. Please see the example below which shows how these changes can be implemented.
Add Buyer Address to EasyPost Labels with Script
‘buyer_address’ is a variable in EasyPost that requires a different notation than other variables due to the fact that it is not populated by InfoPlus; it must be created as an object. Its own variables can then be assigned with it, and then the ‘buyer_address’ with its inner variables can be mapped to the EasyPost ‘buyer_address’ variable. Here is an example script, customizing the shipment options for buyer_address:

Commercial Invoices - Add Signature and Letterhead with Script
You may run into an error when shipping to/from certain countries when using FedEx or other Carriers:
"FedEx returned error: The COMMERCIAL_INVOICE requires an electronic LETTER_HEAD."
If you want to add a signature or a letterhead to your manifest script call, you will need to provide EasyPost with a Signature image and also a Letterhead image. To get these images to EasyPost, email these images to support@easypost.com With your account information. The EasyPost support team can get the process started for uploading them to your account.
Image Sizing
To ensure this process goes smoothly, the sizing of these images will need to be within the following:
- Max width of 700px
- Max height of 50px
Necessary Options to Pass
Infoplus users will need to apply the below script example to complete adding the Signature and/or letterhead.
Signature and Letterhead Script Example:
Example Manifest Scripts for Customizing eHub Manifest Calls
Set Custom Label Text / Parcel Label References
Manually set/override the "parcel label ref" fields on your parcel labels to show the order's and customer PO number and customer order number. See eHub API docs for more information.
////////////////////////////////////////////////////////////////////////////
// customizeEhubCall
//
////////////////////////////////////////////////////////////////////////////
function customizeEhubCall()
{
   utils.log("Starting customizeEhubCall");
   utils.log("Running for Order: " + orderNo);

   utils.log("Shipment options before customization: " + shipmentMapForRate);

   order = infoplusApi.getById("order", orderNo);
   shipmentMapForRate.get('options').put("label_text1", "PO " + order.customerPONo);
   shipmentMapForRate.get('options').put('label_text2', order.customerOrderNo);

}
Set Country and/or State Codes
Manually adjusting the country and state codes that are sent to eHub:
////////////////////////////////////////////////////////////////////////////
// customizeEhubCall
////////////////////////////////////////////////////////////////////////////

function customizeEhubCall()
{
   utils.log("Starting customizeEhubCall");
   utils.log("Running for Order: " + orderNo);
   utils.log("Shipment options before customization: " + shipmentMapForRate);

   /////////////////////////////////////////////
   // Customize the to_location values        //
   /////////////////////////////////////////////

   shipmentMapForRate.get('to_location').put('state', 'PR');
   shipmentMapForRate.get('to_location').put('country', 'US');
      utils.log("Shipment options after customization: " + shipmentMapForRate);
}