Connect Infoplus to your Magento 2 Site
If you have a Magento eCommerce site, you can integrate the site with Infoplus. Infoplus provides connections for Magento 2, described here, and for Magento 1. When an order is placed on your Magento site containing Infoplus SKUs, use Infoplus to fulfill the order. Your Inventory levels from Infoplus are automatically pushed to Magento. Everything happens in real time.
NOTE: We recommend that you first set up the Magento 2 integration on a test Magento site (if you have one). Then, after testing, do the same thing on your production Magento site.
Here's what happens after connecting Infoplus to your Magento 2 Site:
- When a Magento order is placed, Infoplus will be notified of the new order.
- Infoplus will evaluate each of the products in that order. If any products are flagged for being fulfilled by Infoplus in Magento, the order and the Line Items will be pulled into Infoplus where the order can be fulfilled. Line items that are not flagged to be fulfilled will be ignored. If no items on the order are set to be fulfilled by Infoplus, the order will not be pulled into Infoplus.
- When the order is shipped in Infoplus, Infoplus notifies Magento of the order's shipped status, and tracking numbers are added to the Magento order.
- Inventory levels for Magento products flagged for being fulfilled by Infoplus will be pushed from Infoplus to Magento in real time. You may configure your products in Magento to be removed from your site when they are out of stock, to help prevent taking Backorders.
Connecting Infoplus to your Magento 2 Site is a 6-step process:
(Detailed instructions for each step are listed below.)
- In your Magento site, install the Infoplus Connect extension from the Magento Marketplace.
- In your Magento site, create a new Role & User. This information will be used to connect your Magento site to Infoplus during the creation of your Shopping Cart Connection.
- In Infoplus, create your Shopping Cart Connection.
- In your Magento site, finalize the connection between Infoplus and Magento by providing the URL of your Infoplus instance.
- In your Magento store, flag any products that you want to be considered for fulfillment by Infoplus.
- Place test orders in your Magento store and review Infoplus results.
Once connected, you may want to turn on Shopping Cart Alerts in Infoplus. This lets you see messages that Infoplus receives from Magento (i.e., if an error occurred).
Step 1: Install the Infoplus Connect Extension into your Magento 2 Site
This step gives Infoplus access to your Magento site.
- Click on the Infoplus Connect extension in the Magento Marketplace.
- Add the Extension to your cart and complete your purchase.
NOTE: You may need to log into the Magento Connect Marketplace to continue. - After completing the installation, return to the Admin Panel and log out and back in to ensure you are using a new session to continue with the next set of steps.
Step 2: Create a User Role & User in Magento 2
This information will be used to connect your Magento site to Infoplus in a later step.
Create a New Role
Create a New Role
- Open Magento and access the Admin Panel.
- Click on the System icon in the left sidebar. Then click on User Roles.
- Click the Add New Role button. The New Role screen appears.
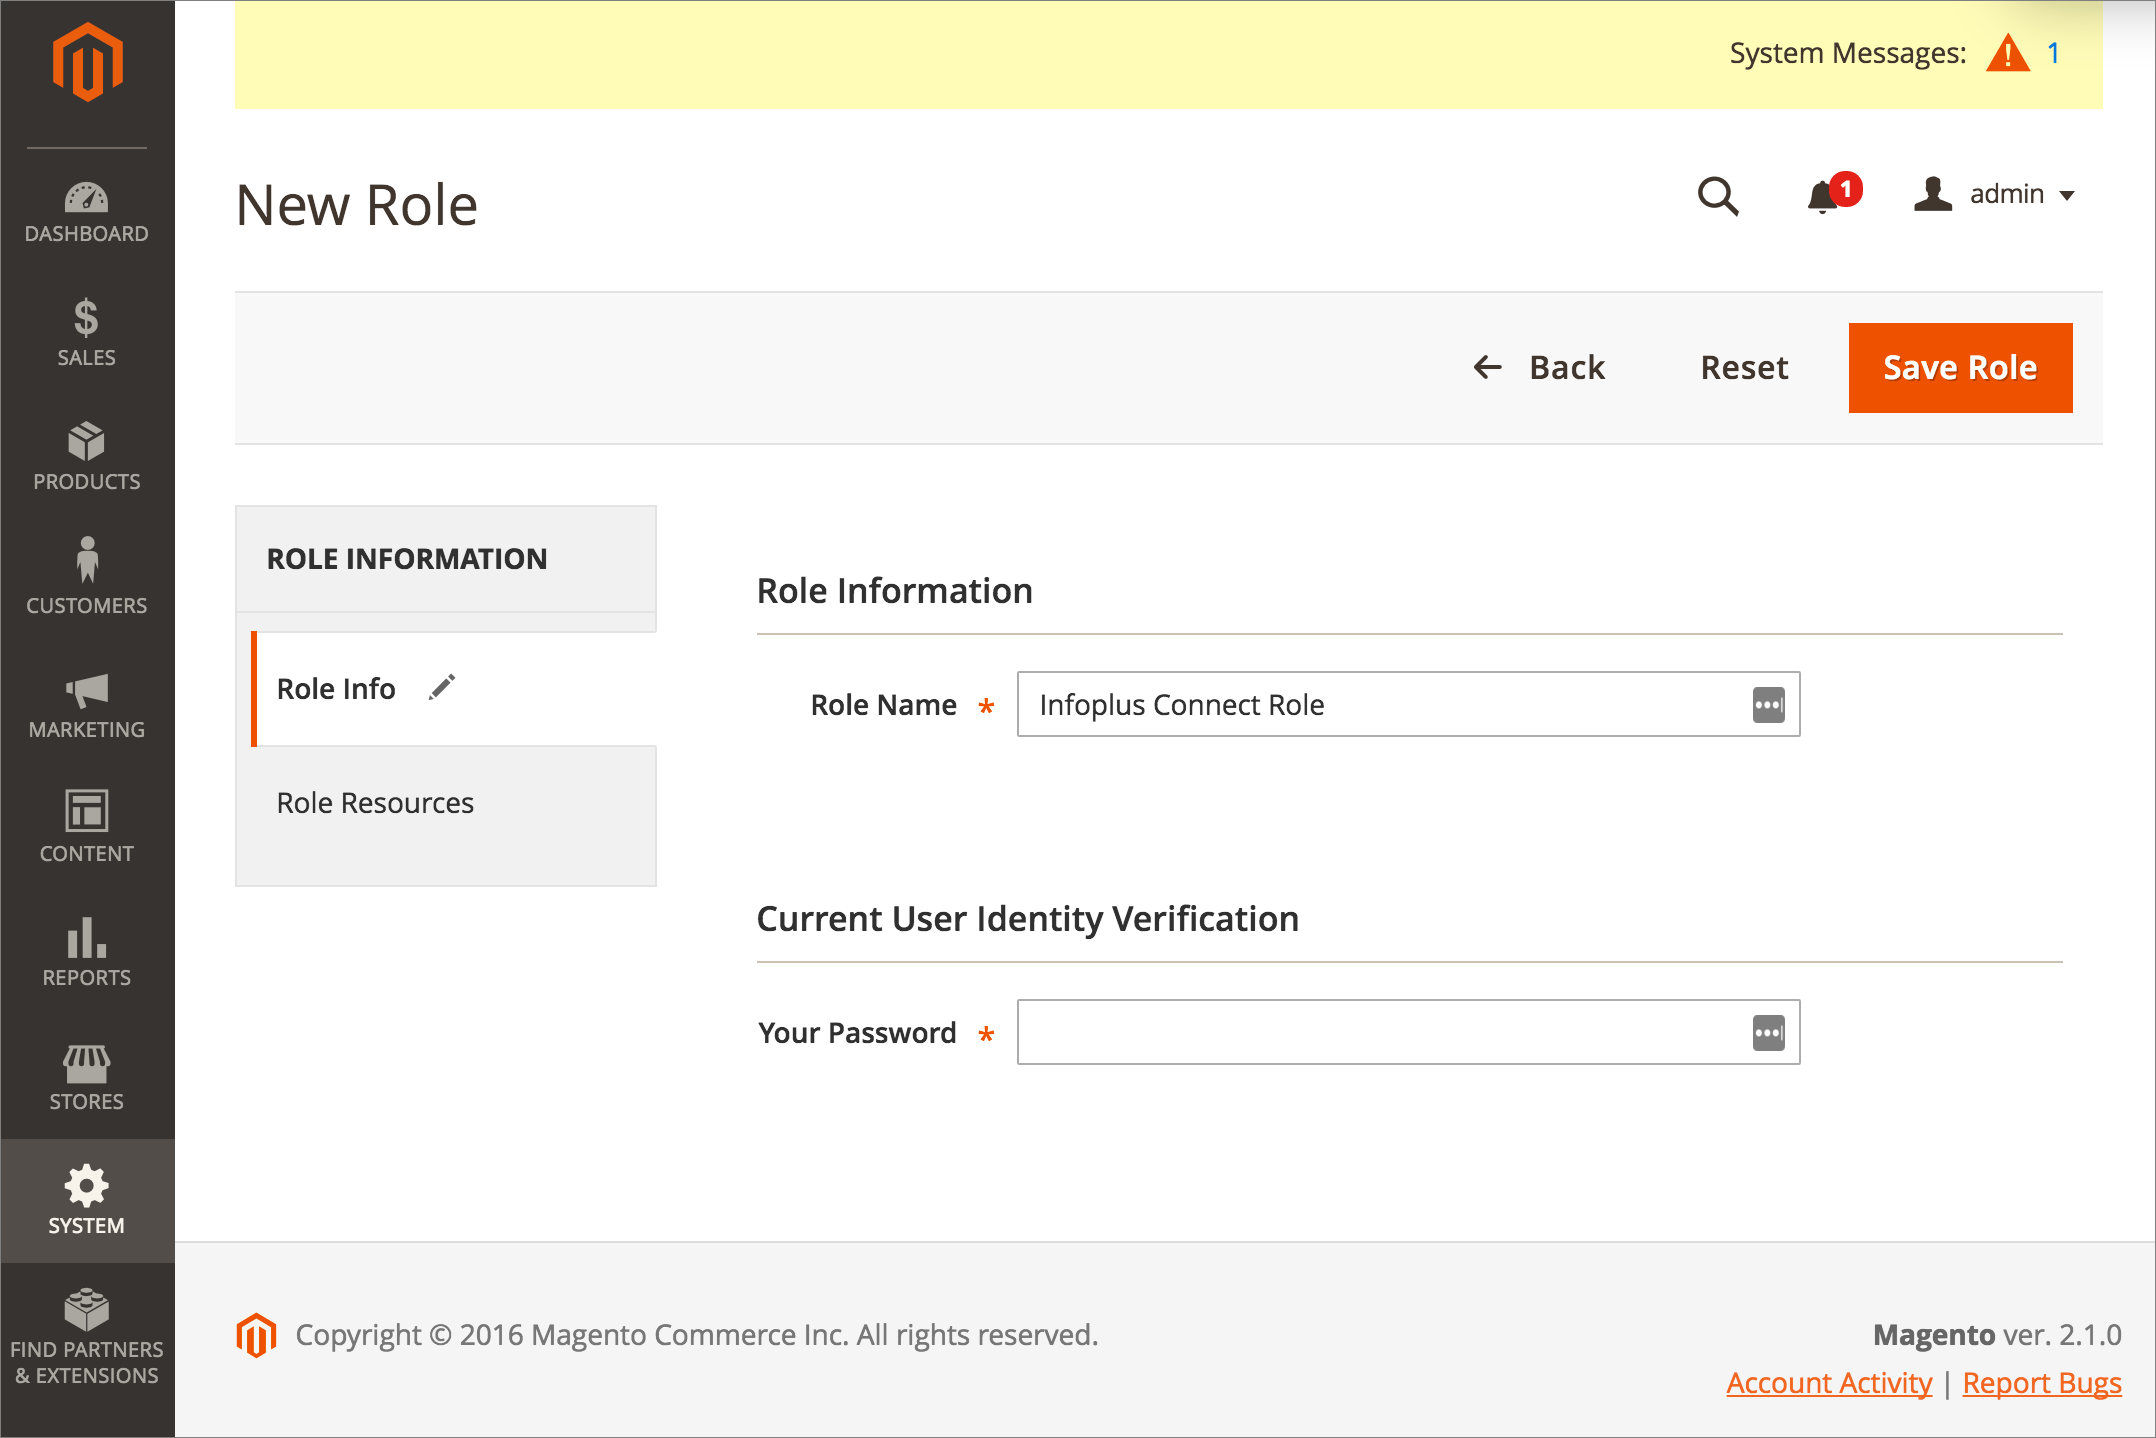
- Type in the Role Name. We recommend naming the role "Infoplus Connect Role."
- Provide Your Password for identity verification.
- Click on Role Resources on the left. The resource list appears.
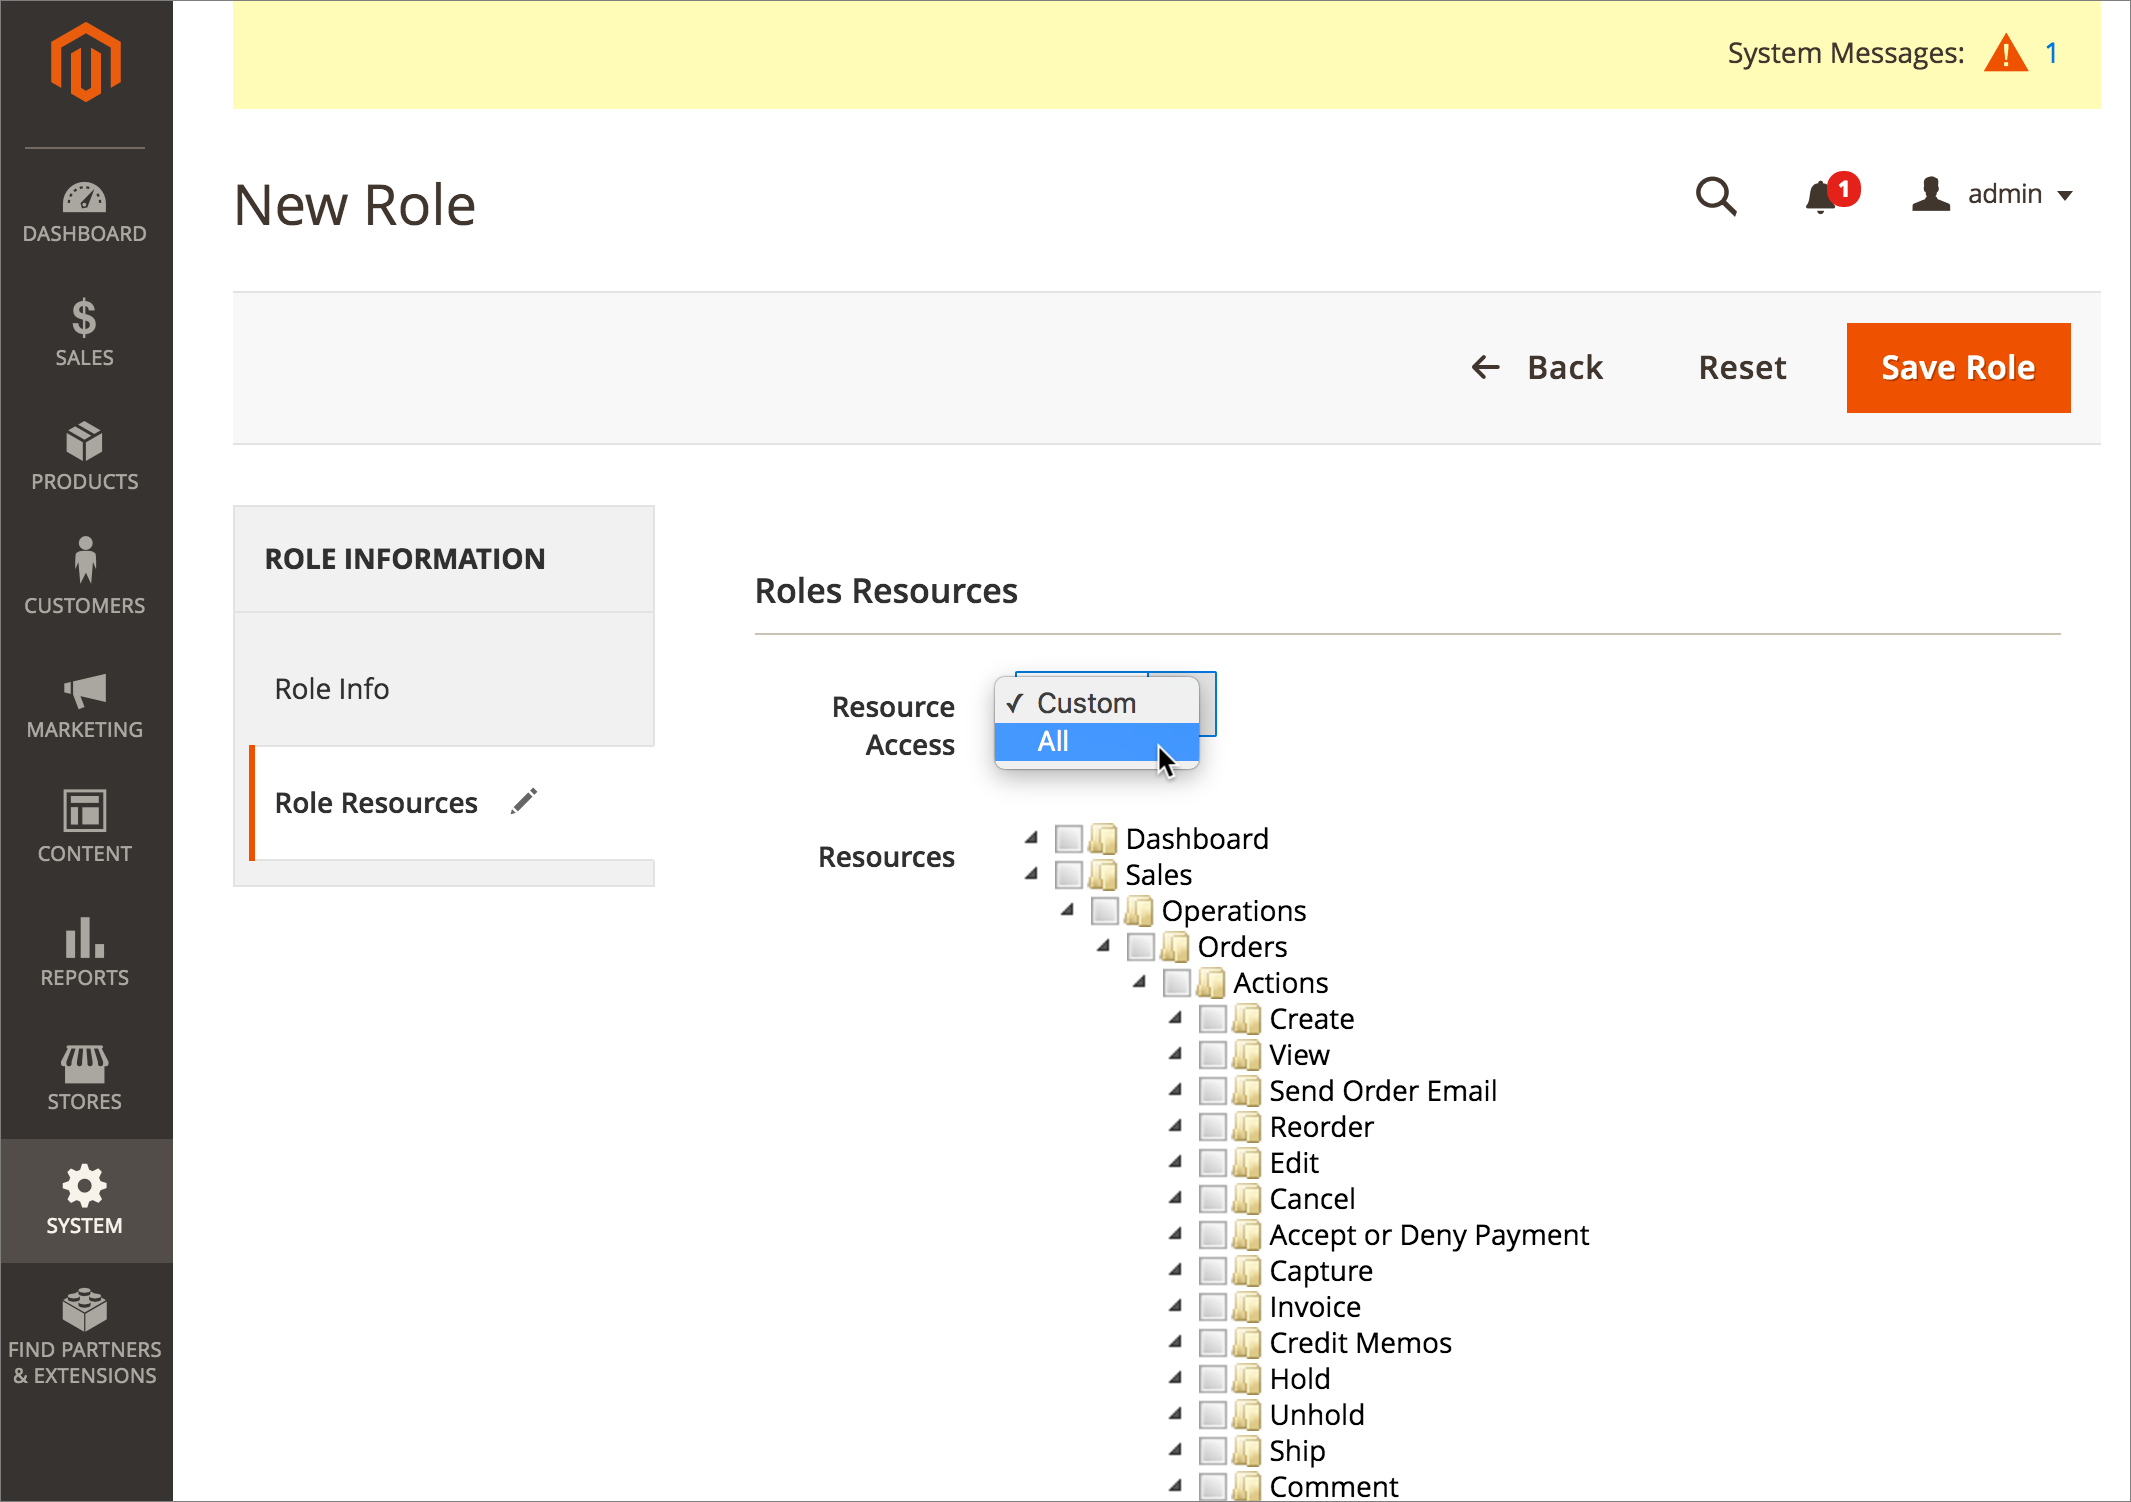
- Select "All" from the Resource Access dropdown.
- Click Save Role.
Create a New User
Create a New User
- From the Magento Admin Panel, click on the System icon in the left sidebar. Then click on All Users.
- Click the Add New User button. The New User screen appears.
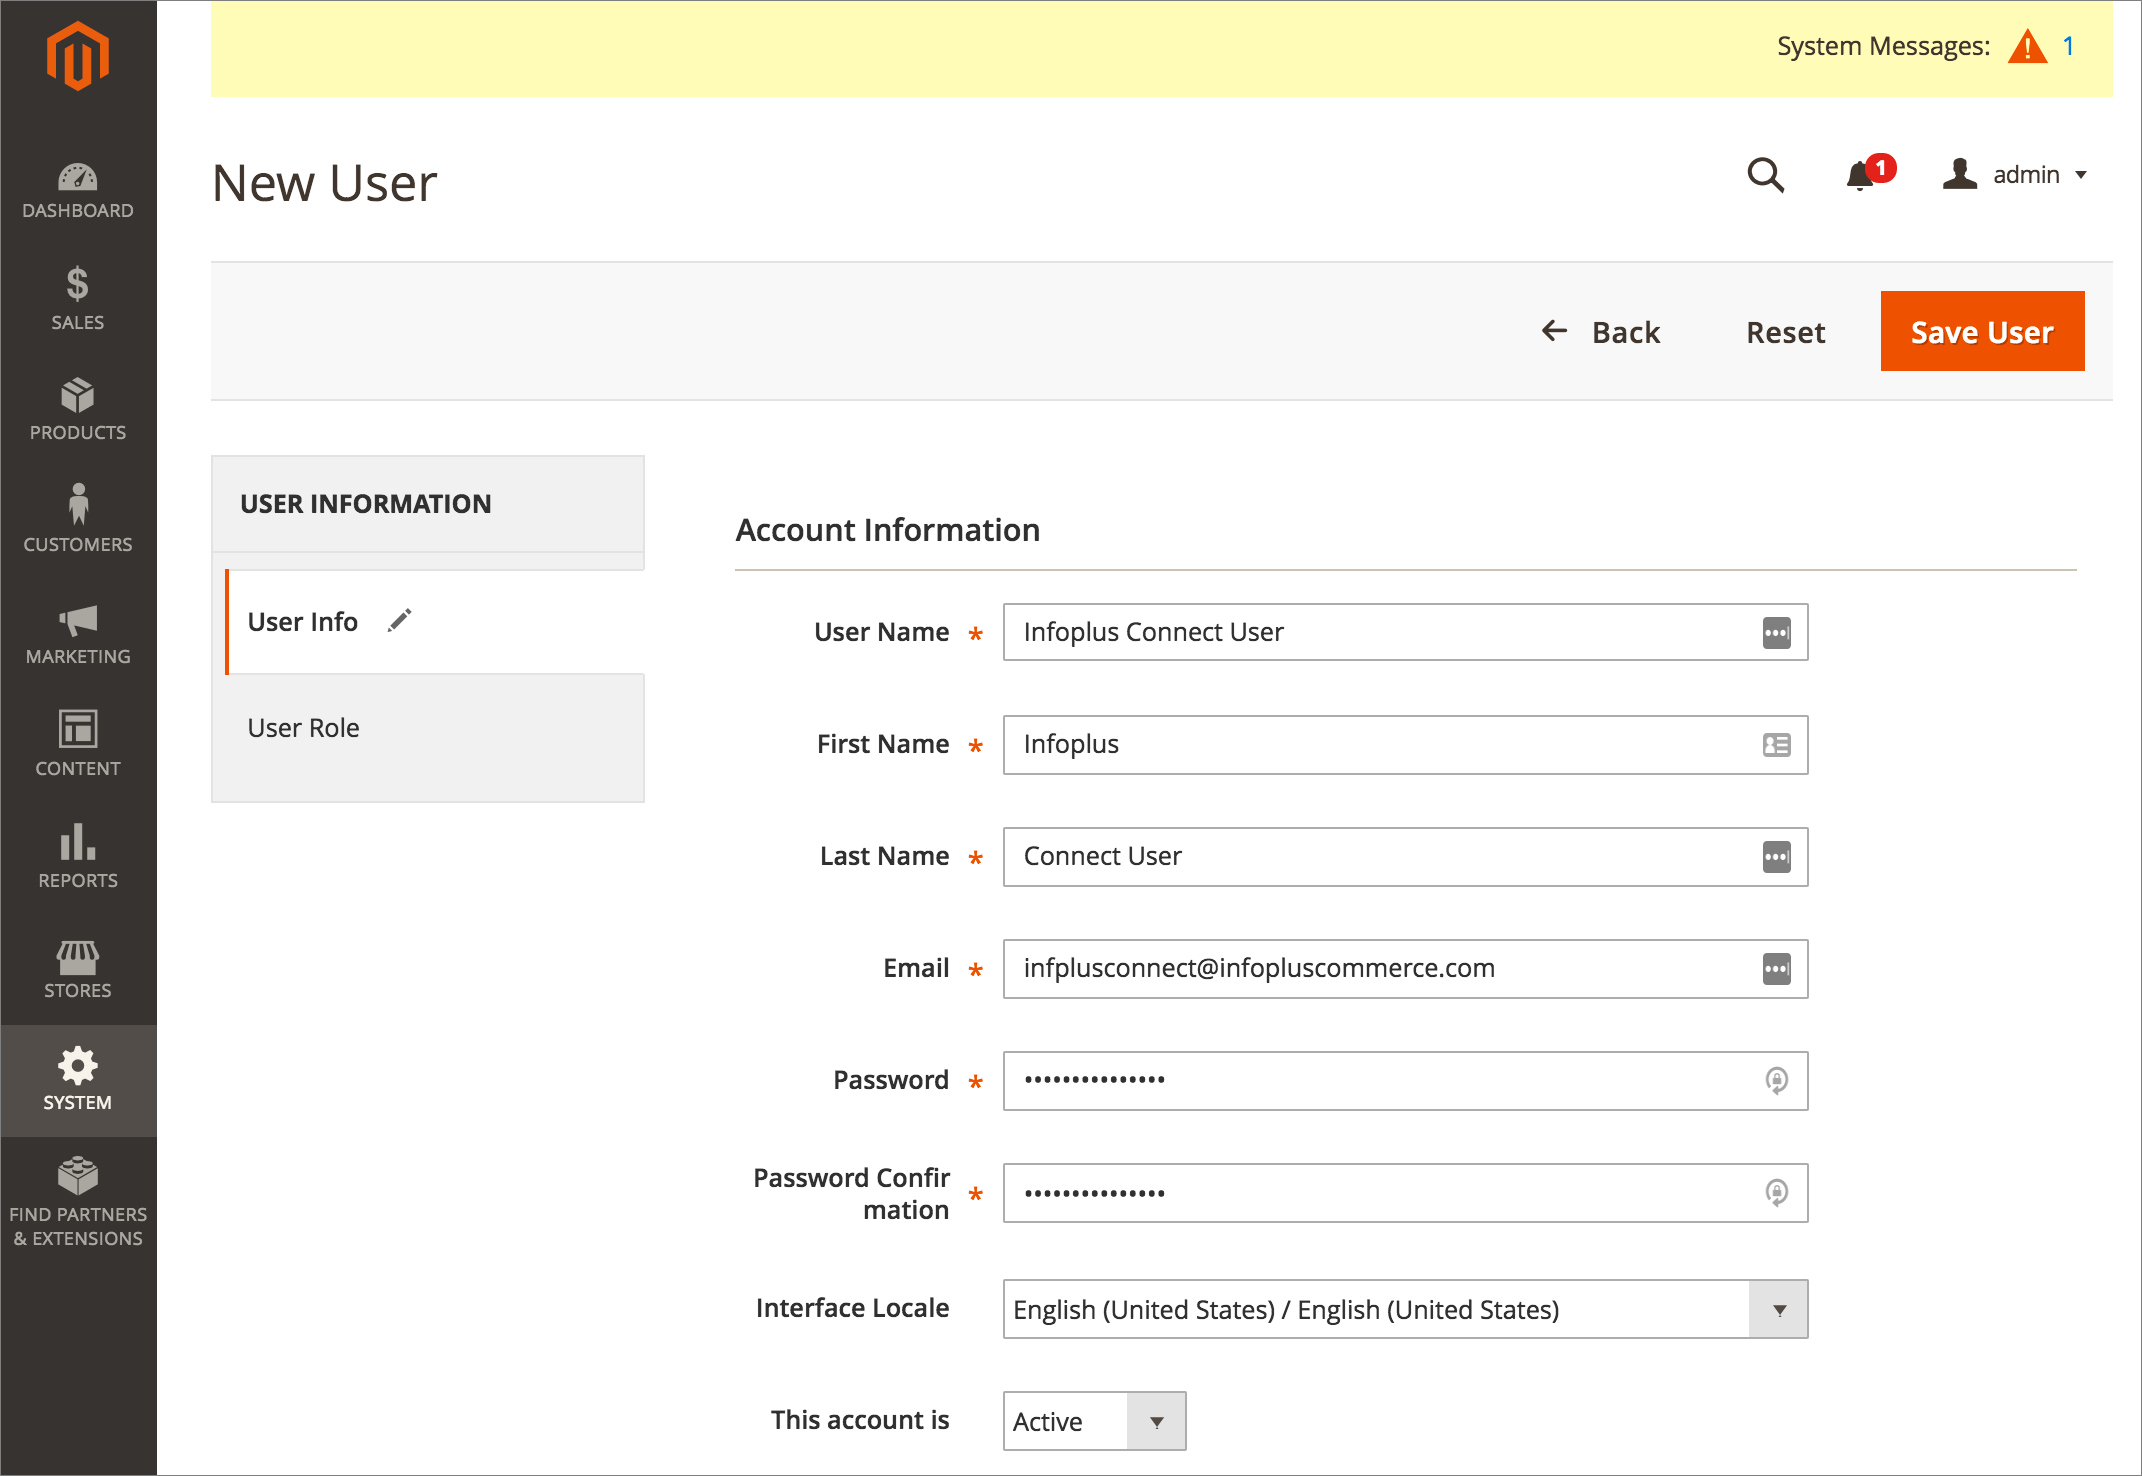
- Fill in the Account Information for the user. We recommend the following:
- User Name: Infoplus Connect User
- First Name: Infoplus
- Last Name: Connect User
- Email: infoplusconnect@infopluscommerce.com
- Password: Use a randomly generated and secure value. Be sure to keep track of this password for later use.
NOTE: Consider using an online service for generating this random password. Here is a search to identify a service. - Provide Your Password for identity verification. You may need to scroll down to view this field.
- Click on the User Role section on the left, and select the Role you created earlier.
- Click Save User.
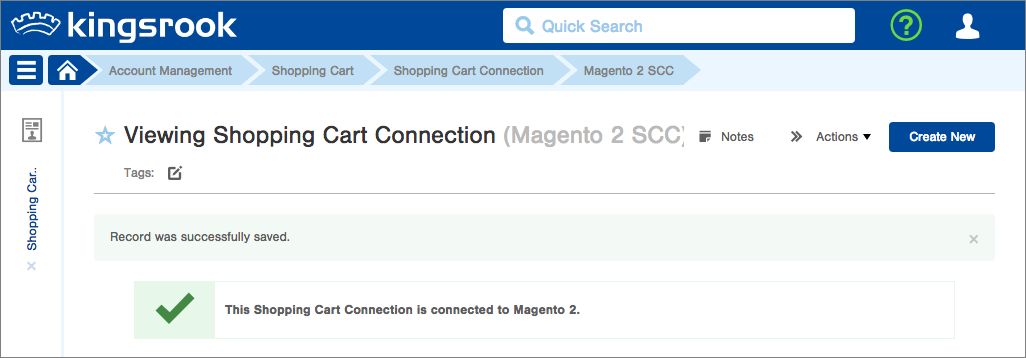
Step 3: Create an Infoplus Shopping Cart Connection for Magento 2
- In Infoplus, go to the Shopping Cart Connection table. Two ways:
- From the Dashboard: Click the “Account Management” tab, click the “Shopping Cart” App, then click the “Shopping Cart Connection” Table.
- From the Quick Actions shortcut: Press a dot (period) on your keyboard, then select “Shopping Cart Connection” from the list of Quick Actions. -
Click the Create New button. The Creating New Shopping Cart Connection window appears.
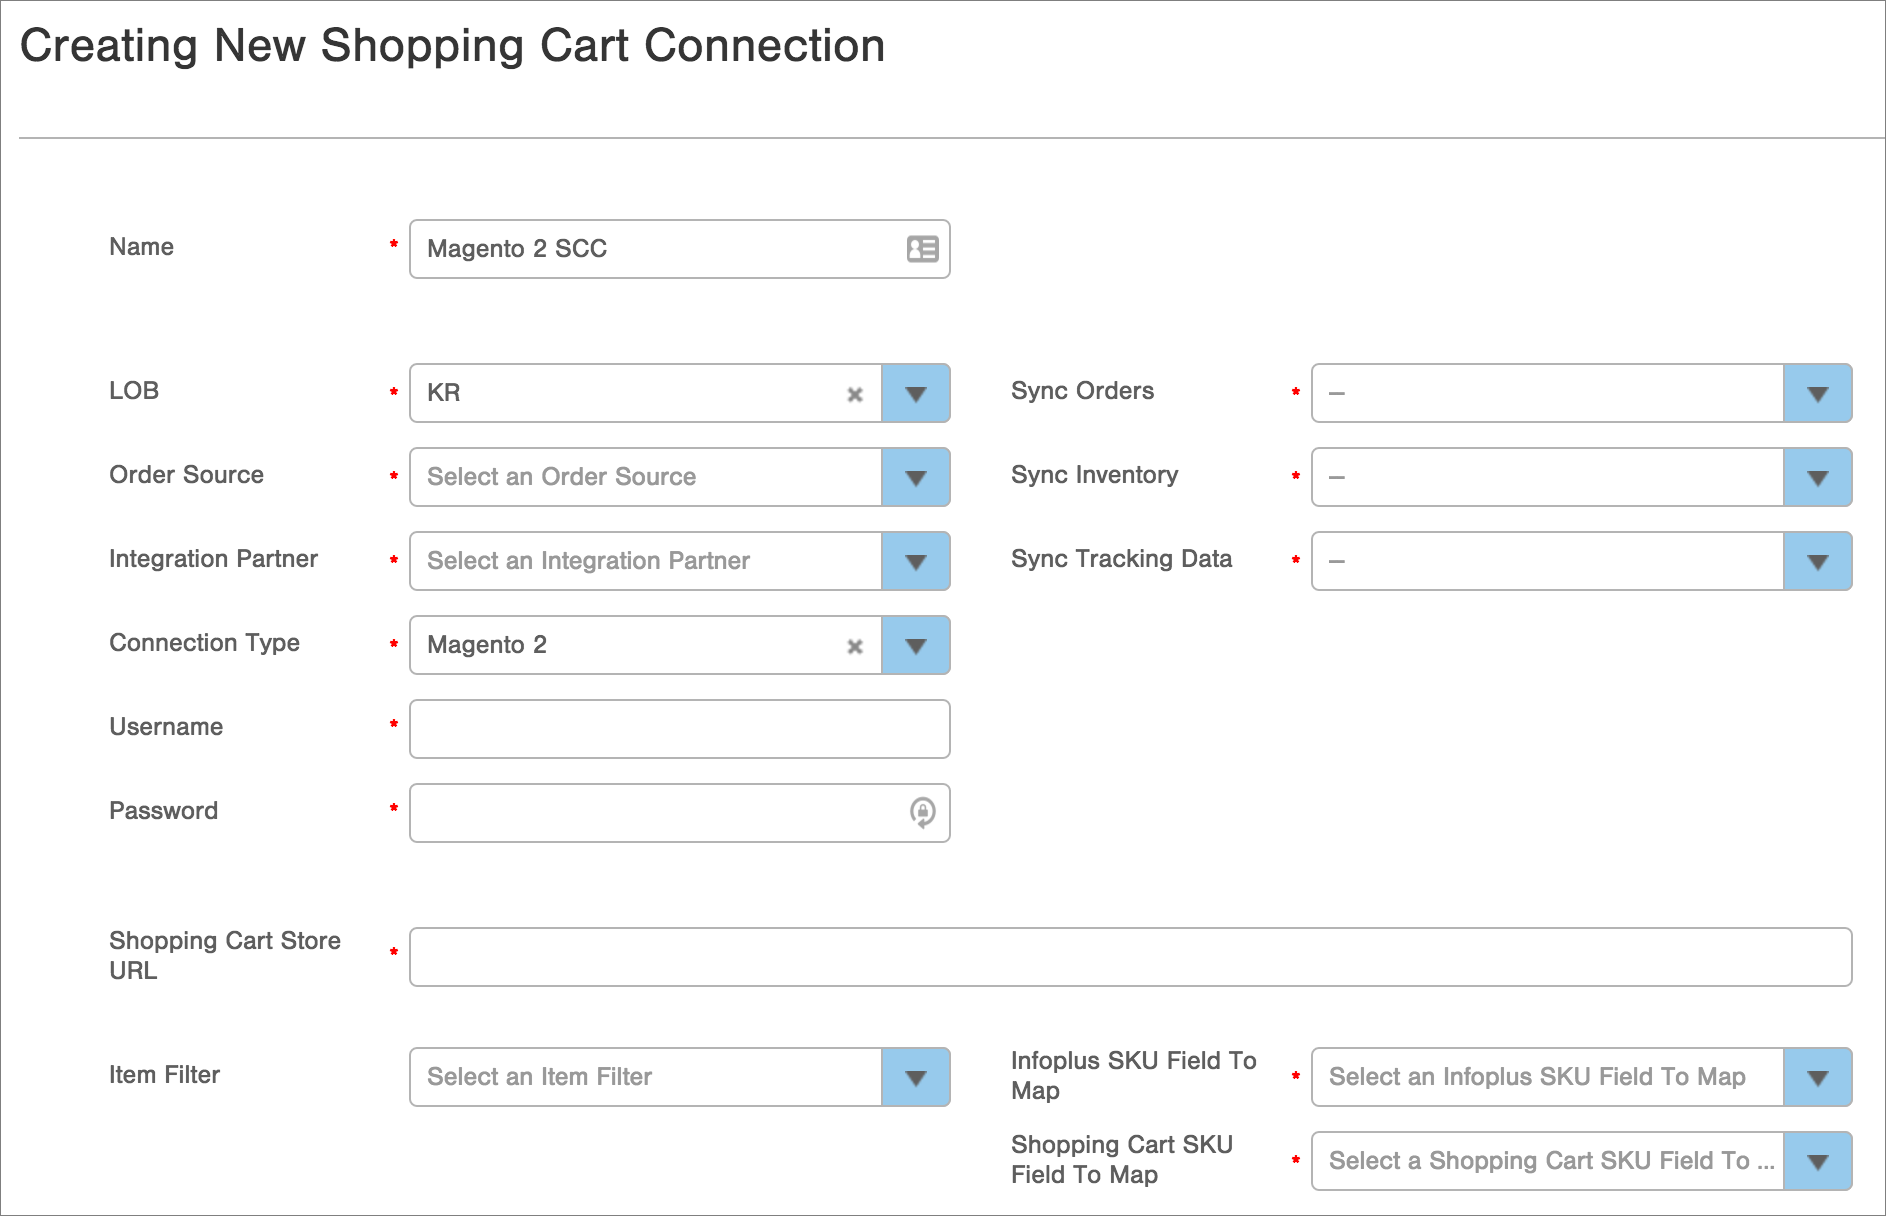
- Type a Name for the Shopping Cart connection (e.g. Magento 2 SCC).
- In the LOB field, select the Line of Business associated with the shopping cart.
- Select the Order Source associated with the shopping cart (e.g. Walmart, Amazon). If an Order Source is not applicable, select "Not Specified." Selecting an Order Source for Magento orders lets you locate records and perform other actions in Infoplus (e.g., create metrics associated with the Order Source).
NOTE: Selecting an Order Source does not communicate which Magento orders are to be fulfilled by Infoplus. It provides information only. - Select the Integration Partner for this shopping cart connection (e.g. SPS Commerce). If there is no Integration Partner, select "Not Specified."
- In the Connection Type field, select "Magento 2." New fields for Username and Password will appear.
- Enter the Username from the Magento 2 user account that you created previously, e.g. "Infoplus Connect User".
- Enter the Password from the Magento 2 user account that you created previously.
- In the Sync Orders field, select whether you want Orders that are placed in Magento to be synchronized with Infoplus. By selecting "True", when orders are created in Magento containing items to be fulfilled by Infoplus, an order will automatically be created in Infoplus.
- In the Sync Inventory field, select whether you want the Inventory levels to be pushed from Infoplus to Magento. Selecting "True" tells Infoplus to communicate inventory levels to Magento. Once synchronized, quantities of selected items will match.
- In the Sync Tracking Data field, select whether you want shipment Tracking Data to be pushed from Infoplus to Magento. Selecting "True" turns synchronization on. For example, you may want to send tracking data if you use Magento to email shipment confirmations.
- In the Shopping Cart Store URL field, enter your Magento store URL, e.g., "https://mystore.com/magento2".
- The Item Filter field is optional. If you have a specific set of items that Infoplus should consider when pushing inventory levels to Magento, create a filter in the Item table, and then select the Filter here. If all items are to be considered, leave the field blank.
NOTE: Later in this process of connecting Infoplus to your Magento site, you will need to specify within each Product record in Magento if inventory levels should be pulled from Infoplus. An Item Filter simply allows you to narrow the list of items down further as opposed to updating each item in Magento. - In the Infoplus SKU Field to MAP and Shopping Cart SKU Field to Map fields, select the product identifiers that should be used to match products between Infoplus and Magento. For example, if both Infoplus and Magento use a field called "SKU" to identify the product, set both fields to SKU. If different product identifiers are used, such as Vendor SKU or UPC, select that as the SKU field.
- Click Save. The record will be saved and a message will appear at the top of the screen indicating the connection was made successfully.
Step 4: Provide Your Infoplus Instance URL to Magento 2
- From the Magento Admin Panel, click on the Stores icon in the left sidebar. Then click on Configuration.
- Click the Infoplus tab on the left side of the Configuration window, revealing the Infoplus Settings sub-tab.
- Click on the Infoplus Settings sub-tab. The Infoplus URL field appears on the screen.

- Enter your Infoplus URL, which is the URL for your Infoplus instance. The URL must appear in this format: https://yourcompany.infopluswms.com . Notice that the URL starts with "https://" and has no slash (/) at the end.
- Click Save Config to finalize the connection between Infoplus and Magento.
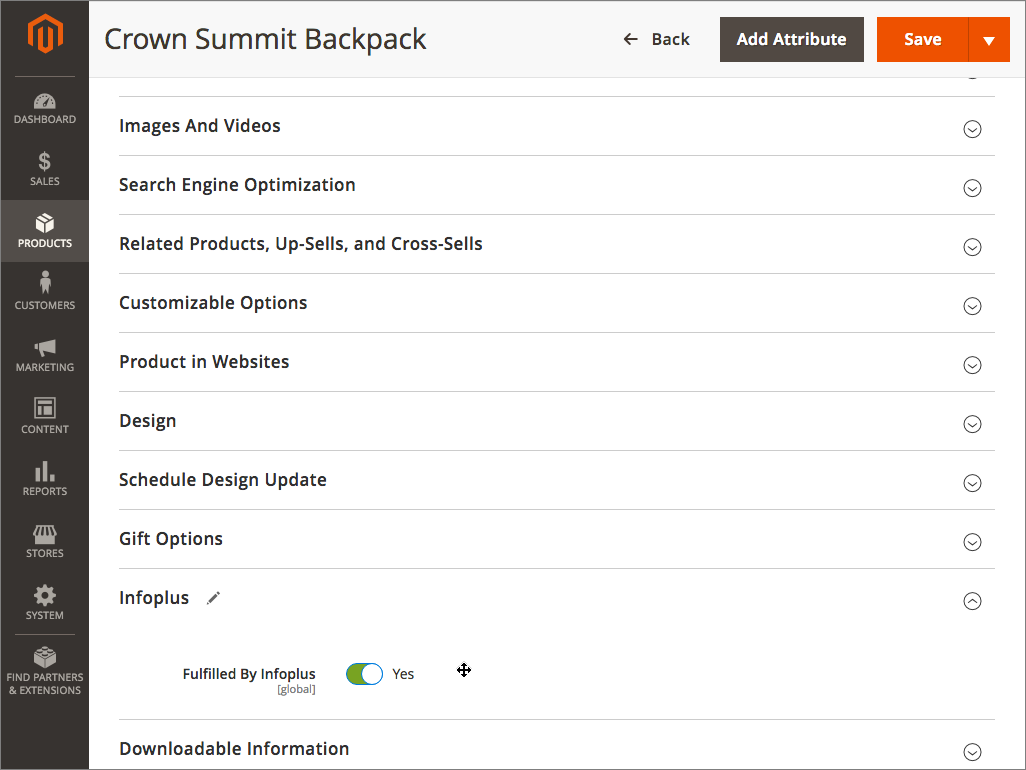
Step 5: In Magento 2, Choose Which Products Should be Fulfilled by Infoplus
For each product you want Infoplus to fulfill, complete these steps in Magento.
NOTE: Infoplus inventory levels for these products will also be available to Magento.
- In Magento, edit the page for the product that should be fulfilled by Infoplus.
- Click on the Infoplus section of the page to view the fulfillment setting for the product.
- Move the Fulfilled By Infoplus slider to the "Yes" position.
- Click the Save button.
Step 6: Test the Integration
This step confirms the integration.
- Place test orders in your Magento store containing one or more of the Products for which you specified fulfillment by Infoplus.
- Evaluate the orders to confirm that the ones that should have been pulled into Infoplus succeeded.
NOTE: If testing on your Live site, you may want to delete the test orders in Infoplus and Magento.
The Infoplus-Magento 2 Integration is complete.
Pro Tip: At this time, Infoplus does NOT support Magento 2 Dynamic Kits. If you have 'Dynamic Kits' toggled to 'true' in your Magento 2 Store Admin settings, you will not be able to import those orders automatically into Infoplus using the API connection.
Troubleshooting Errors with Magento 2 Shopping Cart Connection
If, when attempting to manually push inventory levels of an item to your Magento 2 Shopping Cart, you receive the error message "This Product's Inventory will not be updated because it is not set to track inventory in the Shopping Cart system,” please follow these steps:
- Navigate to your Magento 2 Admin Site > Catalog > Inventory > Products
- Enter the SKU of the item in the search bar
- Observe the value of the “Quantity” column. If this value is blank, Infoplus will not be able to sync inventory, and will throw the above error, and you will need to complete the following steps.
- Click on the item and scroll down to select “General.”
- Scroll down to “Quantity.” Here, you should initialize the field to have a value present.
- After setting a value, navigate to the Item’s record on Infoplus, and manually push inventory again by clicking Actions > Push Shopping Cart Inventory Levels.
- The item’s inventory levels will be pushed to Magento 2, and if the shopping cart connection is configured to automatically sync inventory, it will be included.
