For example, if you include a retail catalog every time a customer places an order on your website, create a smart filter called "Website Orders" that displays only website orders, and then create a trigger to automatically include a retail catalog every time a website order is placed.
Many trigger actions are available, such as Add Line Item, Send Email, Tag Record, Untag Record, Change Carrier, Change Warehouse, Run Script, etc.
NOTE: Multiple actions can be activated by one trigger. For example, one trigger may add a line item AND send an email.
Create a Trigger
NOTE: The smart filter you want to act upon must be created before you can create the trigger. See Create / Manage Smart Filters for more information.- Access the Manage Triggers window by pressing the dot (.) on your keyboard and selecting Manage Triggers from the drop-down menu.
- Click the Create New button in the top right. The Creating Trigger window appears:

- Type a Name for the trigger (i.e., "Include Retail Catalog").
- (Optional) Enter a Description for the Trigger.
- Select the Filter to be used in this trigger (i.e., “Website Orders”).
NOTE: If using an order filter for a trigger that will make changes to the orders as they're inserted, be sure to include the "Pending" status in the order smart filter. This is necessary when using a trigger that will change orders as they're inserted. - Select on which Event(s) the action should occur.
- "Insert" means the action will take place when a new record is created/inserted that meets the smart filter criteria.
- "Update" means the action will take place when an existing record is updated which makes it then meet the smart filter criteria.
NOTE: Regardless of your "Insert" or "Update" event selections, actions will only occur on records from this point forward. - If you want this trigger to be Active immediately, leave the Active slider set to Yes. If you do not want the trigger to be active, click the Active slider to change it to No.
- Click OK. The trigger will display in the list. Here is a sample.

NOTE: To run the smart filter used in a Trigger, click the that appears at the end of the row when you rest your mouse on the row, and select Run Smart Filter.
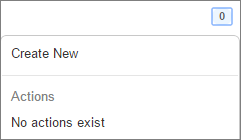
 - Now you need to create the action to be taken on the smart filter: Click the “0” that appears in the Actions column for the trigger. A drop-down menu will appear:
- Click Create New. The Create Actions window appears.
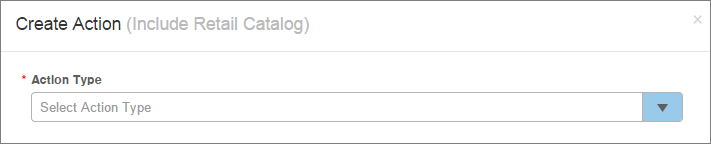
- Select the Action Type (i.e., to include a retail catalog with an order, select the “Add Line Item” action type). NOTE: Only action types available for the table used in the smart filter will display.
- Based on the action type selected, additional fields will appear. Enter or select the required information. (i.e., If you select the “Add Line Item” action type, you will need to enter the SKU and Quantity of the item to be added. If you select the “Run Script” action type, you will need to select an existing Script.)
- Click Save.
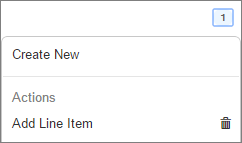
- A “1” will now appear in the Actions column in the Manage Triggers window. Continue to add actions as needed (i.e., If you want an email to be sent to an individual when a record matches the selected smart filter, you could add the “Send Email” action to this same smart filter by clicking the number in the Actions column).
Users to Alert
Each trigger action has a "Users to Alert" setting/column that controls which users will see the alert on their Alert table when the trigger fires.
How it works:
- When a trigger fires and generates an alert, InfoPlus creates the alert only for the users listed in "Users to Alert" on that trigger action.
- Users who are not on the list will not see the alert on their Alert table, regardless of their role permissions.
- This is a per-action setting — different trigger actions on the same trigger can alert different sets of users.
To add or remove users:
- Navigate to Manage Triggers and find the trigger you want to modify
- Locate the trigger action that generates alerts
- Click on the user count badge (displayed in blue) in the "Users to Alert" column
- To add a user: select the "Add User" action from the dropdown and choose the user
- To remove a user: select the user and click the "Trash" Icon
- Click "Save" to apply your changes
Important notes:
- Changes to "Users to Alert" only affect future alerts. If you add a user now, they will start receiving alerts the next time the trigger fires — but alerts that were already generated will not retroactively appear on their table.
- If no users are listed in "Users to Alert," the alert may not be visible to anyone on the Alert table (behavior depends on the specific action type).
- "Users to Alert" is separate from role permissions. A user needs both appropriate alert permissions (to access the Alert table) and to be listed in "Users to Alert" on the relevant trigger action (to actually see specific alerts).
Reorder Triggers
Triggers will run in the order in which they display in the Manage Triggers window. You can modify this order to ensure some actions occur before others.
- Access the Manage Triggers window by pressing the dot (.) on your keyboard and selecting Manage Triggers from the drop-down menu.
- Click and drag the 8-dots icon (
 ) that appears to the left of the Trigger to be moved.
 - Release your mouse when you have placed the Trigger into the desired location.
Edit a Trigger
These instructions refer to editing or deleting the Trigger entirely, not editing or deleting the action used within the Trigger. (NOTE: You cannot edit an action used in a trigger action. For example, you cannot edit the "Add Line Item" action you assigned to a trigger. You would need to delete the action and create a new one.)
- Access the Manage Triggers window by pressing the dot (.) on your keyboard and selecting Manage Triggers from the drop-down menu.
-
Rest your mouse on the trigger and click the double arrows icon (
 ) that displays at the end of the record.
-
To Edit the Trigger, click Edit. Make the necessary edits and click Save.
To Delete the Trigger, click Delete. Click OK through the confirmation.
NOTE: From this drop-down, you can also see the Audit log for the Trigger and Run the Smart Filter associated with the Trigger.
Edit/Delete an Action Used in a Trigger
NOTE: You cannot edit an action used in a trigger. For example, you cannot edit the "Add Line Item" action you assigned to a trigger. You would need to delete the action and create a new one.
- Access the Manage Triggers window by pressing the dot (.) on your keyboard and selecting Manage Triggers from the drop-down menu.
- Click the number that appears in the Actions column next to the Trigger that you want to edit. A drop-down will appear:
-
Click the trash can icon (
 ) next to the action to be deleted. Click OK through the confirmation.
Audit a Trigger
View an audit log of activity taken on a trigger.
- Access the Manage Triggers window by pressing the dot (.) on your keyboard and selecting Manage Triggers from the drop-down menu.
-
Rest your mouse on the trigger and click the double arrows icon (
 ) that displays at the end of the record.
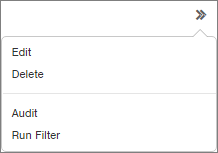
-
Select Audit. The Audit Log appears. Here is an example:

-
To download an Excel file of audit data, click the Download Report button. See Audit a Record for more information on downloading audit data.
-
Click the Close link to close the window.
Run the Smart Filter Associated with a Trigger
- Access the Manage Triggers window by pressing the dot (.) on your keyboard and selecting Manage Triggers from the drop-down menu.
-
Rest your mouse on the trigger and click the double arrows icon (
 ) that displays at the end of the record.
 -
Click Run Smart Filter. The table associated with the smart filter will open with the smart filter applied.