With Smart Document Templates, you can create custom PDFs using data from your records in Infoplus. For example, create documents to customize your warehouse workflows, or invoices for sending to your 3PL customers, or inserts to add to your outbound orders. Any value in a field in Infoplus can be used. You can also customize the data using Scripts, for even more custom control.
Note: If you are experiencing issues with a Smart Document, consider reviewing the Smart Document Troubleshooting article.
How to Create a Smart Document Template
- Navigate to the Smart Document Template table.
- Click the Create New button in the top right. The Creating New Smart Document Template screen appears:

- Enter a Name that describes what this template will display or other relevant information for you to identify the template (e.g., Order Insert Template).
- In the Page Width field, enter the width (in inches) of the page that you will be printing on (defaults to 8.5, for a standard letter page size).
- In the Page Height field, enter the height (in inches) of the page that you will be printing on (defaults to 11, for a standard letter page size).
- In the Record Type field, select the type of record that you will pull value(s) from (e.g., if you want to display data from an Order, select Order as the Record Type, if you want a document with Item details, select Item as the Record Type, etc.).
- In the API Version field, select the version of the Infoplus API that you want to use. This selection will drive what variable names you can use in the Code below. You will typically select the last API used.
- For further customization, you may choose a Script, which you have previously created on your Infoplus site. You can always come back and edit this record, to add a script at a later time.
Using the Source Code Editor for Smart Document Templates
InfoPlus Smart Document Templates utilize the Velocity Template Language (VTL). To achieve the highest degree of control when editing your template's content, you can access the Source Code Editor.
Accessing and Editing the template Source Code
- When creating or editing a Smart Document Template on the Smart Document table, click the Source Code button (represented by
< >) in the editor panel.
- In the editor, you can type the necessary text/html and VTL for your template.
- Note: VTL uses references (starting with
$) to embed dynamic content and directives (starting with#) to execute logic.
- Note: VTL uses references (starting with
Inserting Data References
To request a value from a specific field in the record associated with the Smart Document (i.e. the Record Type), start by typing $record. and then the field name.
- Example: To display the Order Number, you would type
$record.orderNo. - Field names can be found on the Infoplus API Reference Site, corresponding to the selected Record Type and API version.
Important: Using HTML Comments to Wrap VTL Logic
The InfoPlus source code editor is a standard HTML/WYSIWYG interface. This creates a known quirk when incorporating VTL control structures:
- When the editor encounters VTL directives (like
#foreach, which is a Block Directive that requires an#end), especially multi-line blocks, outside of standard HTML tag, it interprets line breaks and whitespace within that Block Directive as plain text. Example of a multi-line block:#foreach( $item in $list )
$item.Name
#end
- This interpretation causes the editor to auto-format the VTL code by inserting HTML paragraph tags (
<p>) around the control structure.
To preserve the VTL's intended structure and prevent the insertion of any unwanted html tags, you must wrap the VTL block in standard HTML comments:
Example Syntax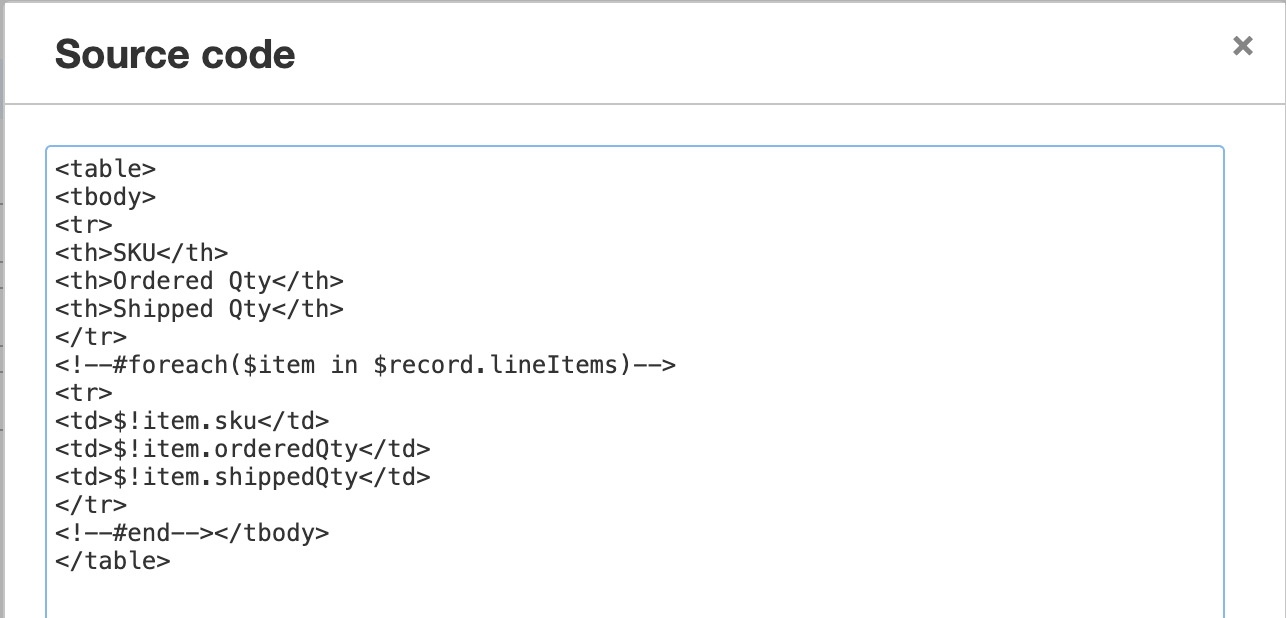
Would result in...
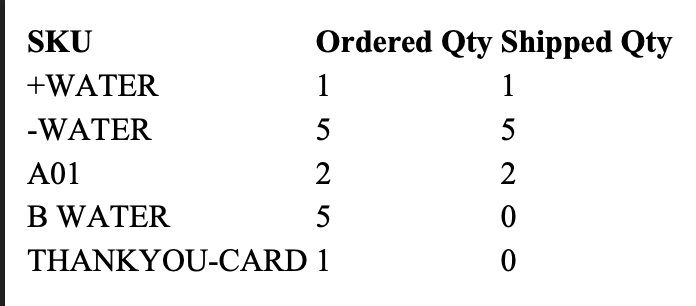
By using this workaround, you are instructing the HTML editor that the VTL content is inert, invisible HTML commentary, which prevents it from being formatted as standard text requiring <p> tags.
For more examples please see the "sample smart document templates" knowledge base article.
Inserting a Barcode or Image
- To insert a barcode, click the Insert/Edit Image button (
 ). This screen will appear:
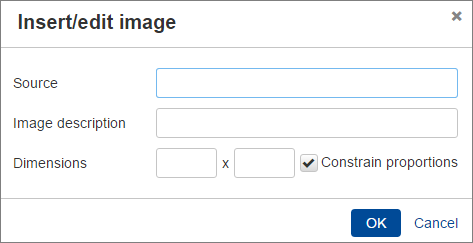
- In the Source field, type $barcodes. and then type the field name that you want represented by a barcode. For example, if you want the Order Number to display as a barcode, type $barcodes.orderNo.
- You can also generate a barcode from any value you wish, besides just fields on the record (such as a field from a different record type, a value generated by a script, or even a hard-coded string) by using code such as: ${utils.generateBase64Barcode($myValue)} to render a barcode from the variable $myValue, or ${utils.generateBase64Barcode('1234-9876') to render a barcode from the string 1234-9876 (being sure to enclose the hard-coded string in single-quote characters, as shown here).
- If the value is an integer, you will first need to convert it to a string using ($myValue.toString())
- To generate a UPC-A barcode for any value you wish, use the following code:
${utils.generateBase64Barcode('UPCA','123456789012')}
- You can also generate a barcode from any value you wish, besides just fields on the record (such as a field from a different record type, a value generated by a script, or even a hard-coded string) by using code such as: ${utils.generateBase64Barcode($myValue)} to render a barcode from the variable $myValue, or ${utils.generateBase64Barcode('1234-9876') to render a barcode from the string 1234-9876 (being sure to enclose the hard-coded string in single-quote characters, as shown here).
- In the Dimensions fields, enter the width and height of the barcode image. These dimensions are typically no less than 100 pixels wide by 40 pixels high.
Here's an example of the completed Insert/edit image screen for the Order Number label shown above: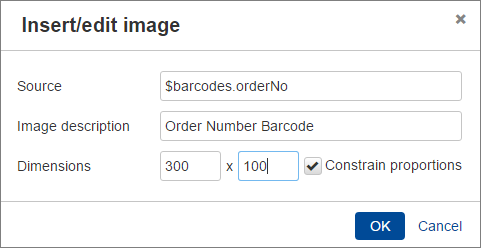
- Click OK.
- Apply any formatting to the content in the Code Editor as needed (e.g., to center all of the content, select the content and then click the
 button).
 - Once you are done creating the Smart Document Template, click Save. The template is saved and available for use.
Preview the Smart Document Template
You can preview a Smart Document Template any time, but we recommend previewing the template immediately after you create it to ensure it displays as desired.
- From within the Smart Document Template record, select Actions > Preview Smart Document Template. The Setup step in the process appears.
- Enter a Record ID to use for the preview. For example, if you are previewing a template showing an Order Number, enter an existing order number to use as the record in the preview.
- Click Next. The Review step in the process appears.
- Review the Results. If a green arrow displays, the preview will be generated.
- Click Submit. The final Results screen appears.
-
To view the template, click Download Report. Another tab will open in the browser displaying the preview.
-
Click back on the Infoplus browser tab and click OK to close the preview process. If you need to edit the template, open the template record and select Actions > Edit.
Render a Smart Document Report
A Smart Document Report will render documents using one or more selected records based on the Smart Document Template you select.
- Access the Table containing the records you want to use in the Smart Document report (e.g., if you want to generate documents for Orders, access the Orders table).
- Click the checkbox next to each record that you want to use in the Smart Document report.
- Click the Actions button.
- Under the Reports sub-header, select Smart Document. The Setup step in running the report appears.
-
Select the Smart Document Template you want to use.
-
If you want more than one copy of the document for each record, enter the appropriate number into the Copies per Record field (e.g., if you wanted a label to appear inside a carton, outside the carton, and one for your paperwork, type a 3).
-
Click Next. The Review step appears.
-
Review the Results for each record selected.
-
Click Submit. The final Results screen appears.
-
To view the report, click Download Report. Another tab will open in the browser displaying the report.
-
Click back on the Infoplus browser tab and click OK to close the report process.
More Information
Specifications
We recommend only using the following basic HTML tags/attributes when creating Smart Documents: b center colgroup dd div dl dt em font h1 h2 h3 h4 h5 h6 hr i img li ol p pre span strike strong style sub sup table table tbody td tfoot th thead tr u ul
Other tags and attributes maybe be replaced, removed, or ignored. Also note that although the user interface may support other tags, the rendering engine that creates the PDF document may not. For example,
<img src="http://example.com/example.svg" />
will work in the user interface, but not in the PDF rendering engine.
The HTML content of the code will be wrapped with the following before rendering:
<html><head>
<style>@page { size: [Page width]in [Page height]in; margin: 0in; }</style>
</head><body>
[Smart Document HTML]
</body></html>
Custom Font Family
You can change the font family of text in a smart document by creating a parent element that surrounds the text and then setting the font family of that parent element. For example, you could create a div element and then set its font-family property to sans-serif. Here is an example of how you would do this in the smart document "source code":
Code snippet from the example above:
<div style="font-size: 20px; font-family: 'Comic Sans MS';">
<p>HELLO</p>
</div>
<div style="font-size: 20px; font-family: 'sans-serif';">
<p>WORLD</p>
</div>
Note that we cannot guarantee that all font families will work in our smart documents - you may need to experiment with different settings/fonts to get the desired results.
Border Scaling
If you are using a table it is easiest to set your border properties in percentages. Using the code below, the table border will automatically scale to the width of your barcode settings. You can pad it at 98 or 99%% to leave print margins.
<table border="0" width="100%" cellspacing="0" cellpadding="3">
Custom Font Sizes
Headings and font sizes can be manipulated with the following examples:
<td style="font-size: .7em; text-align: center;" colspan="2">
<h2 style="font-size: 1.1em; text-align: center;">$record.sku</h2>
Formatting Date Fields
Date fields can be formatted using the following:
$record.dateField.replaceAll("^(....)-(..)-(..).*", "$2/$3/$1")