-1.png?width=150&height=40&name=InfoPlus-Primary-Logo%20(1)-1.png)
Is This What I'm Looking For?
Use this article if you want to send your customers automatic emails about their order. This article covers building the template, adding your own text and data, testing it, and turning on automatic sending. It does not cover setting up your AWS SES account for a custom From address.
Before You Begin
- You'll need permission to access the Email Template table.
- Know which Line of Business (LOB) the template belongs to.
- If you want emails to come from your own email address instead of the default, you'll need to verify that address first. See the steps under Verify a Custom From Address below.
- If you plan to set up automatic sending, you'll need edit access to Order Sources.
- Know which Template Type you need:
| Template Type | Sent When |
| Order Confirmation | Order moves to "On Order |
| Shipment Confirmation (Parcel) | Manifest partner confirms shipment is in transit |
| Shipment Confirmation (Non-Parcel) | Shipment is marked shipped |
| Out for Delivery Confirmation | Manifest partner confirms out for delivery |
| Delivered Confirmation | Manifest partner confirms delivery |
| Custom | Used for records other than orders - see Custom Email Templates |
CAUTION: Parcel shipment emails (Shipment Confirmation - Parcel, Out for Delivery Confirmation and Delivered Confirmation) are triggered by manifest partner updates. InfoPlus will only send an email after a status update is received from your manifest partner (eHub, EasyPost).
This is true even if the associated order is marked as Shipped in InfoPlus.
Steps to Create a Template
- Go the to the Email Templates table.
- Click Create New.
- Fill in the required fields:
- Enter a Name for the email template like, "Simple Order Confirmation Email"
- Select the Line of Business (LOB) the template belongs to
- Select an Email Template Type
- If you pick Custom, select a record type and choose which field the email address should come from.
/NewEmailTemp%20PickRecord.png?width=504&height=258&name=NewEmailTemp%20PickRecord.png)
- If you pick any type except Custom, select which address to use: bill to, ship to, both
/NewEmailTemp%20NonCustom.png?width=503&height=211&name=NewEmailTemp%20NonCustom.png)
- Set the From Address
Use the default address, no-reply@infopluscommerce.com, unless you've already verified your own address. An unverified address will cause errors. - Set the From Name
Enter the name you want customers to see in the From field. This requires your AWS SES account to be configured first. Contact InfoPlus Support to set this up. - Enter the Subject Text
Write the subject line your customers will see, like "We received your order!" - Write the Email Content
Enter your content into the Header, Detail, Line Items, and Footer sections. These all appear together in the finished email. They're split up here so you can organize your work with the dynamic code for pers
Use the Template button in each section's toolbar to speed up formatting. Use the Insert Template button to drop in a pre-built block, like a standard Line Items layout./EmailTemp%20LineItems.png?width=670&height=152&name=EmailTemp%20LineItems.png)
- Add Variables to personalize the email
Type $ in any content field to bring up a list of available variables, like the customer's order number. The list shows 10 variables at a time. Type more letters, like ${order.s, to jump to a specific group. See the full variable list at the end of this article./EmailTemplate%20Variable.png?width=276&height=318&name=EmailTemplate%20Variable.png)
- Add Line Item Display functions if needed
Use ShippedLineItems, NonShippedLineItems, or CustomLineItemList to control which items show up in the email.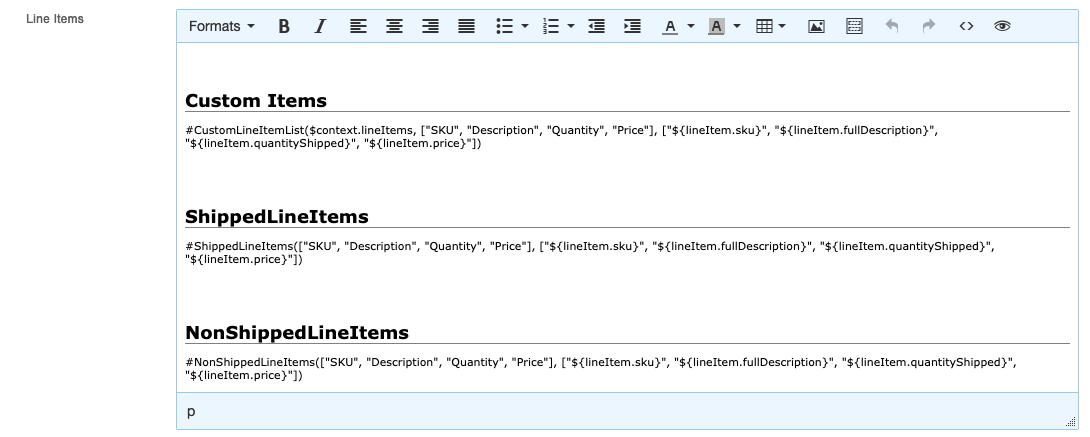
- Click Save
Send Yourself a Test Email
- Set the From address to your own email
- Save the Template
- On the Email Template table, check the box next to your template
- Click Actions → Send Email Template Preview
Set Up Automatic Sending (Optional)
- Go to the Order Source table
- Select the Order Source you want to add the automation to
- Click Actions → Edit
- Scroll to the Templates section
- Select the email template you want to send for each notification type
- Click Save
CAUTION: Ensure every template you create is assigned to the correct LOB that is associated with the Order Source you want to add the automation to.
Send a Template Manually from an Order (Optional)
- Go to the Orders table
- Click the order you want to send an email for
- Click Actions → Edit
- Navigate to the tabs and select Templates
- Select the email template(s) under the Confirmation Emails section
- Click Save
Verify a custom "From" address (Optional)
- Submit a Support ticket with the email address you want to use
- Watch for a verification email from no-reply-aws@amazon.com. Check your spam folder if you don't see it.
- Click the link within 24 hours of receipt. If the link expires, ask Support to resend it.
- Once verified, you can select that address as your From Address.
If you want a 3PL or third party's address instead, CC them on your Support ticket. Their assistance may be needed for the setup.
What To Expect
Once you save your template, it appears in the Email Template table with the LOB and type you assigned. When you send a test email, you'll receive it at the address you set as the From address, formatted with your header, detail, line items, and footer content. If you turned on automatic sending, the email goes out when the order or shipment reaches the status tied to that template.
Example Email:
/EmailTemplate%20Body.png?width=358&height=730&name=EmailTemplate%20Body.png)
Troubleshooting
Why isn't my confirmation email sending?
Shipment, Out for Delivery, and Delivered emails only send after your manifest partner (like eHub or EasyPost) confirms the status update. This is true even if the order already shows as shipped inside InfoPlus.
Why did my email fail to send or show an error?
Your From Address may not be verified yet. Until it's verified, use the default address: no-reply@infopluscommerce.com.
Why doesn't my new template show up as an option on the order source?
Confirm that the template's Line of Business (LOB) matches the order source's Line of Business.
Available Fields/Variables on Email Templates:
Listed below are variables that can be directly used in the Email Content area of email templates to represent data in the system:
Order variables:
- ${order.shippingAndHandling}
- ${order.tax}
- ${order.orderDate}
- ${order.distributionCharges}
- ${order.merchandiseTotal}
- ${order.trackingNos}
- ${order.total}
- ${order.shipDate}
- ${order.processNo}
- ${order.customerOrderNo}
- ${order.orderNo}
- ${order.shipTo.state}
- ${order.shipTo.zip}
- ${order.shipTo.country}
- ${order.shipTo.street3}
- ${order.shipTo.street2}
- ${order.shipTo.street1}
- ${order.shipTo.city}
- ${order.shipTo.phone}
- ${order.shipTo.email}
- ${order.shipTo.company}
- ${order.shipTo.attention}
- ${order.shipTo.default}
- ${order.shipTo.firstName}
- ${order.shipTo.lastName}
- ${order.billTo.state}
- ${order.billTo.zip}
- ${order.billTo.country}
- ${order.billTo.street3}
- ${order.billTo.street2}
- ${order.billTo.street1}
- ${order.billTo.city}
- ${order.billTo.phone}
- ${order.billTo.email}
- ${order.billTo.company}
- ${order.billTo.attention}
- ${order.billTo.default}
- ${order.billTo.firstName}
- ${order.billTo.lastName}
- ${order.customer.name}
- ${order.customer.customerNo}
- ${order.customer.id}
- ${order.carrier.company}
- ${order.carrier.carrier}
- ${order.carrier.companyCode}
- ${order.orderSource.name}
- ${order.orderSource.id}
Line Item Variables:
- ${lineItem.restrictionRule}
- ${lineItem.id}
- ${lineItem.adjustCode}
- ${lineItem.crossDock}
- ${lineItem.per}
- ${lineItem.unitCost}
- ${lineItem.fullDescription}
- ${lineItem.allowQuantity}
- ${lineItem.chargeCode}
- ${lineItem.price}
- ${lineItem.quantityShipped}
- ${lineItem.sku}
- ${lineItem.revisionDate}
- ${lineItem.orderQuantity}
- ${lineItem.processFlag}
- ${lineItem.poNo}
- ${lineItem.distributionCode}
Email Tracking Variables:
If you are using a MD5 hash to track customer order confirmation emails, you can add the variable below in conjunction with a script to pass the information to your direct marketing company.
// An Email script can take an API Model object as input, and can produce output that is available to the Email Template:// // A script of this type has the following variables available:// // record - object - an instance of an Infoplus API model, for the record the template is being rendered against.// output - object - where script can put values into for the template to access, via method: put(key, value)// // Example:if(record.customerOrderNo){ output.put("md5Hash", utils.generateMD5Hash(record.customerOrderNo.toLowerCase()));}
Next Steps
- Send emails for records other than orders by using Custom Email Templates