Quick Receipts Series: Part 1
How to Create Quick Receipts
When you don't need an Advanced Shipping Notification (ASN) or Purchase Order for receipt of items, use Quick Receipts to quickly receive inventory into your warehouse.
Here are some reasons to use Quick Receipt versus the standard receiving process of receiving items against an ASN (Advanced Shipping Notification) or Purchase Order:
- You are just starting with Infoplus and want to get your current on-hand inventory into the system
- You have static locations for your items and each time a receipt arrives you want items to be combined into the location you already have in the system. (This requires mixing rules to be established appropriately.)
- You do not have an ASN/PO prior to receipts arriving and want a simplified way to put away items without having to create an ASN. If you have an ASN or PO to receive items, work through the standard receiving process by first creating a receiving worksheet.
Create a Quick Receipt (One Item at a Time)
NOTE: To load multiple Quick Receipts, see Bulk Load.
- Access the "Quick Receipt" table. Two ways:
From the Dashboard: Click the “Warehouse Operations” tab, click the “Receiving” App, then click the “Quick Receipt” Table.
From the Quick Actions shortcut: Press a dot (period) on your keyboard, then select “Quick Receipt” from the list of Quick Actions. - Click the Create New button in the top right. The Creating New Quick Receipt screen appears.
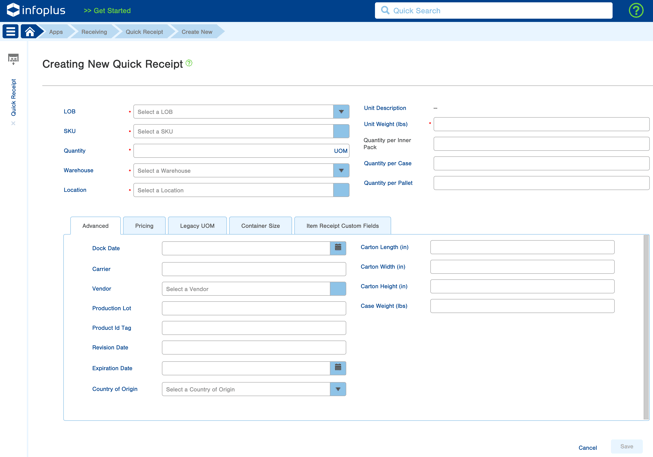
- In the LOB field, select the Line of Business to receive the inventory.
- Select the SKU of the item you are receiving. You can begin typing the SKU or click the Search link at the bottom of the drop-down window to search for the item.
- Enter the Quantity of the item to be received.
- Select the Warehouse to receive the inventory.
- Select the Location where the inventory should be placed.
- Enter the Unit Weight. This is the total weight of the unit which impacts shipping selections and requirements.
- Update UOM fields as necessary. Quantity per Inner Pack, Quantity per Case, Quantity per Pallet. If these are left blank the data will be pulled from the Item record.
- If the Item can be shipped as a case, enter the number of Units per Case.
- Optionally, in the Advanced tab, complete any pertinent fields for this Quick Receipt.
- If it is part of your operating procedure to record when inventory arrives on your dock, enter the Dock Date. (Click the calendar icon to use an interactive calendar.) If not entered this date will default to the current date.
- Carrier: The shipping Carrier who delivered the inventory
- Vendor: The Vendor from which the inventory originated
- Production Lot: The Lot from where the Items were received
- Product ID Tag: An ID (barcode or number) assigned to an item to provide an additional level of tracking (See Create and Use a Product ID Tag Scheme for more information)
- Revision Date: A Revision Date for the Item
- Origin: The country from where the Item originated
- Carton Length: The length of the carton (in inches)
- Carton Width: The width of the carton (in inches)
- Carton Height: The height of the carton (in inches)
- Case Weight: The weight of a case of the items (in pounds) - Optionally, in the Pricing tab, complete any pertinent fields for this Quick Receipt.
- Cost: How much did the item cost?
- Sell: For how much is the item being sold?
- Pricing Per: How many units do the pricing include (e.g. each, dozen, etc.). NOTE: If you specify either a 'Cost' or 'Sell Price', 'Pricing Per' is required. - Click Save. The Quick Receipt is saved and in a status of Open. To make the item available for allocation, Execute the Quick Receipt.
NOTE: Information entered when creating a receipt does not go through any validation (e.g. confirming that the quantity is valid or that the location is available). Validation occurs when executing a quick receipt.
Edit a Quick Receipt
You can only edit a Quick Receipt that is in the status of Open meaning it has not yet been executed/committed. If you need to uncommit a receipt, see Uncommit Item Receipts.
- Access the "Quick Receipt" table. See the instructions above.
- Click on the Quick Receipt that you want to edit to open the record.
- Click the Edit button at the bottom of the record.
- Make the necessary edits and click Save.
Execute Quick Receipts
After creating a Quick Receipt, you will need to Execute the receipt to indicate that the item has been put away and is available for ordering.
How to Execute Quick Receipts
- Access the "Quick Receipt" table. Two methods:
From the Dashboard: Click the “Warehouse Operations” tab, click the “Receiving” App, then click the “Quick Receipt” Table.
From the Quick Actions shortcut: Press a dot (period) on your keyboard, then select “Quick Receipt” from the list of Quick Actions. - Click the checkbox next to each quick receipt you want to execute.
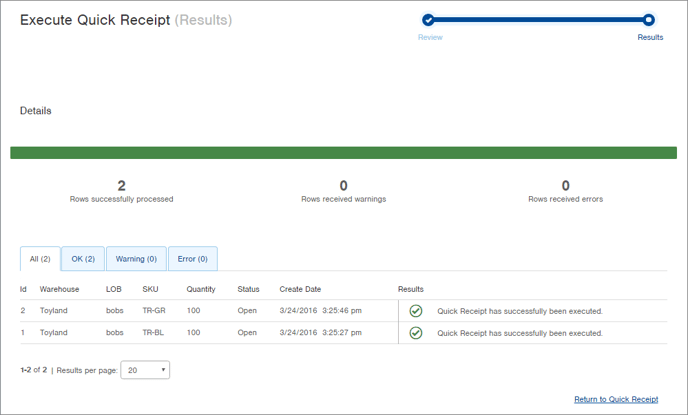
NOTE: You can execute multiple Quick Receipts at a time by selecting all the records you want (i.e., after performing a search to display only receipts to be executed) by clicking the checkbox in the upper left corner. Only the records on the current page will be selected, but a link at the top of the window allows you to select all records. - Click the Actions button and select Execute Quick Receipts. The Review step of the Execute Quick Receipts process appears.

- Review the planned Results. The “All” tab displays the planned results for each selected record. You can narrow your view of results by clicking on the other tabs (OK, Warning and Error). In the example above, one record received an error indicating that the location in the Quick Receipt record is already occupied. You would need to modify the Location in the Quick Receipt record to be able to submit this record. The other record is OK and will be executed once the Submit button is clicked.
- Click Submit to submit all valid Quick Receipts. Valid Quick Receipts will have been executed and the final Results screen will appear.
After the Quick Receipt was executed:
- The Status of the Quick Receipt changed from Open to Closed
- The inventory is now available for allocation
- An ASN record (Advanced Shipping Notification which is also referred to as a Purchase Order), was created for each item in the Quick Receipt.
The process is complete, you can return to the table or elsewhere in Infoplus.
ANS will show a status of "Received" once the QR- is closed.
NOTE: If a mistake was made when receiving items (e.g. wrong quantity, wrong warehouse, etc.), you can Unreceive an Item Receipt. ![]()