What is a Parcel Account?
In Infoplus, a Parcel Account represents your unique shipping account with a carrier company like UPS, FedEx, or USPS. It allows you to automate label generation and streamline your shipping within Infoplus. To leverage these benefits, you'll need to connect your existing carrier accounts to Infoplus through a third-party "Manifest Partner." These partners act as intermediaries, using webhooks to facilitate communication between Infoplus and your chosen carrier for automated label generation.
Infoplus currently natively supports these Manifest Partners:
- EasyPost
- eHub
⚠️ Key Difference: Parcel Accounts vs. Carriers
It's important to distinguish between Parcel Accounts and Carriers in Infoplus:
- Parcel Account: This represents your specific relationship (shipping account) with a carrier company (e.g., your UPS account number).
- Carrier: This refers to the combination of the actual carrier (e.g., UPS, FedEx) and the various shipping options/services they offer (e.g., UPS Ground, FedEx 2-Day Air).
How to Create a New Parcel Account
The first step when you need to create a new parcel account is to set up the connection between the company (FedEx, UPS, etc.) and Infoplus through your Manifest Partner or another a Third-Party Webhook provider.
Please Note: InfoPlus does not support the following USPS First Class services: First Class Card, First Class Letter, or First Class Flat. These options will need to be purchased outside of InfoPlus.
How to Connect the New Parcel Account to Infoplus
1. Navigate to the Parcel Account table in Infoplus in one of two ways:
- Click the period button on your keyboard and type in Parcel Account
- On the homepage, navigate to Apps>Shipping>Manifest Setup>Parcel Account
2. Click 'Create New' in the top right corner.
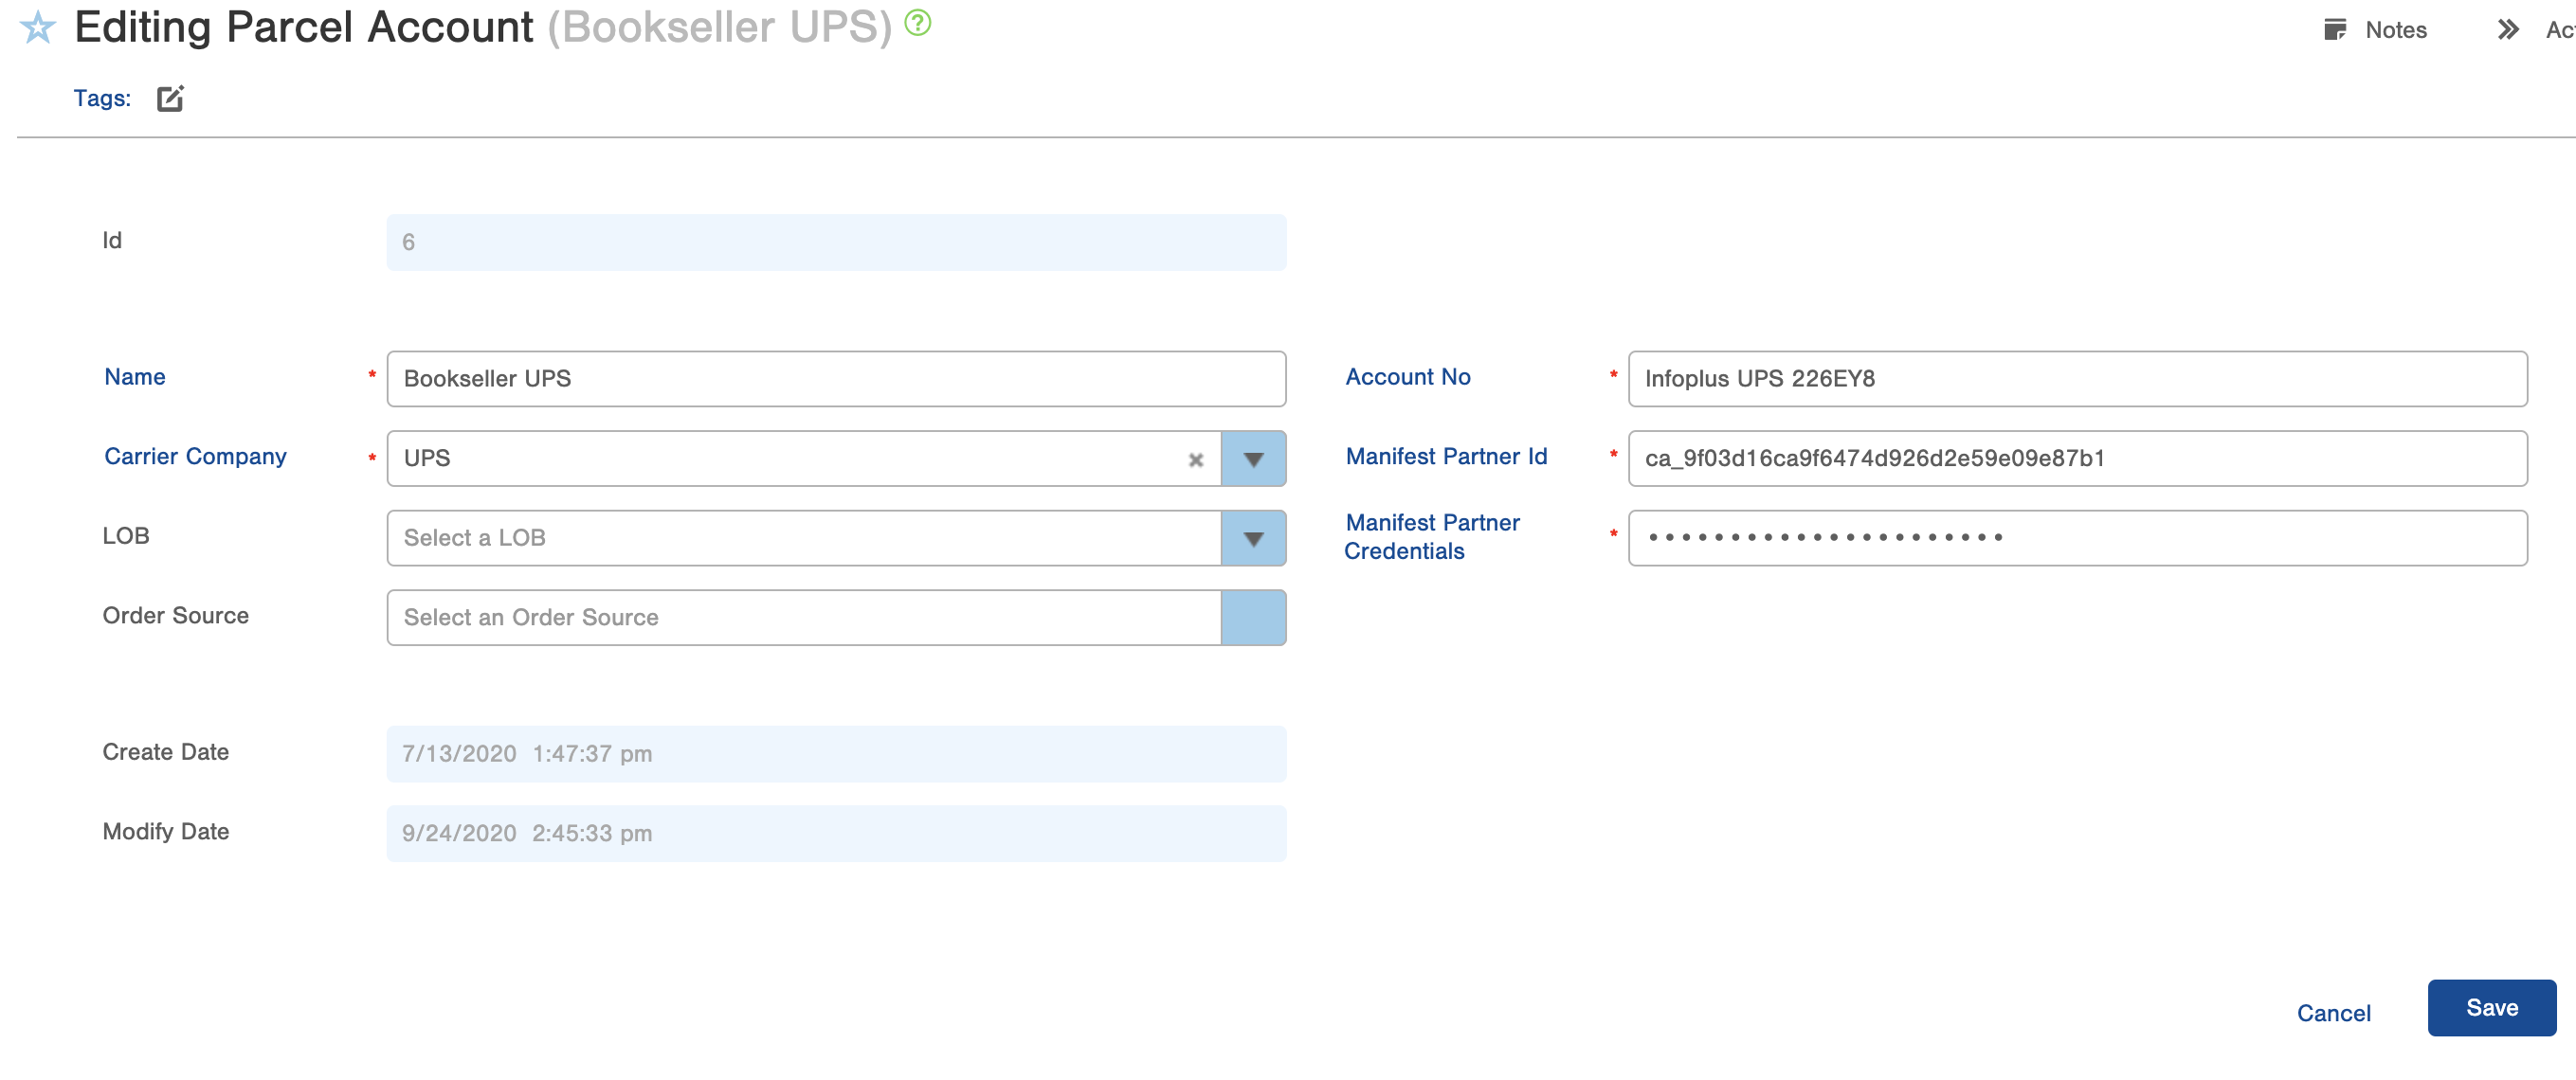
3. There are 5 required items to fill in on the Parcel Account table:
- Name: The value entered in this field will be how the account shows up in the rest of Infoplus. (eg InfoPlus USPS, Infoplus UPS 12345, etc)
- Carrier Company: This is a drop-down list of all of the Carrier Companies that are available in Infoplus.
- Account No: This is the account number that the carrier company assigned to your account. If USPS, just put USPS.
- Manifest Partner Id: This ID is provided by your chosen Manifest Partner/Third-Party Webhook provider (e.g., EasyPost or eHub) and acts as a unique account identifier within their system. You'll receive this ID after creating an account with your manifest partner. NOTE: This ID value is not your account email address.
- Format: This ID will typically look like...
ca_xxxxxxxxxxfor EasyPost accountseHub_xxxxxxxxxxxxxfor eHub accounts
- Format: This ID will typically look like...
- Manifest Partner Credentials: This value comes from your Manifest Partner/Third-Party Webhook provider. This is the API Key that is listed in your account settings on your Manifest Partner's site. Note that your Manifest Partner Credentials/API Key will typically look like a long, random string of characters and numbers.
- To find your eHub API Key, please see How to Retrieve an eHub API Key
- To find your EasyPost API Key, please see How to Retrieve an EasyPost API Key
Note: Manifest Partner Id values must be unique for each parcel account when rate shopping. If you attempt to rate shop with duplicate Manifest Partner IDs, you may experience issues with rate shopping.
Setting Up UPS SurePost via EasyPost
UPS SurePost is a hybrid shipping service that uses the UPS network for pickup and line-haul, then hands off final delivery to USPS. To use UPS SurePost in Infoplus, you'll need to enable it on both your UPS account and your EasyPost account before creating the parcel account in Infoplus.
Step 1 – Confirm UPS SurePost is Enabled on Your UPS Account
Before setting anything up in EasyPost or Infoplus, verify that your UPS account has been activated for SurePost. If you're unsure, contact your UPS account representative to confirm or request that SurePost be added to your account.
Step 2 – Add UPS SurePost to Your EasyPost Account
- Log in to your EasyPost account.
- Navigate to your carrier settings and add UPS SurePost as a carrier.
- If you do not see UPS SurePost available to add on your own, reach out to EasyPost customer support and request that it be enabled on your account.
- Once added, EasyPost will provide (or you can locate) your Manifest Partner Id (
ca_xxxxxxxxxx) and API Key — you'll need both for the next step.
📝 Note: Your EasyPost API Key (Manifest Partner Credentials) is the same across all carriers in your EasyPost account. However, the Manifest Partner Id (ca_xxxxxxxxxx) will be a new, separate value — EasyPost assigns a unique carrier account ID for UPS SurePost even though it uses the same underlying UPS account number. You can find this new ca_ ID in your EasyPost carrier settings after adding UPS SurePost.
Step 3 – Create the UPS SurePost Parcel Account in Infoplus
Follow the standard steps in the "How to Connect the New Parcel Account to Infoplus" section above, using the following values:
| Name | Something descriptive, e.g., UPS SurePost-EasyPost |
| Carrier Company | UPS SurePost |
| Account No | Your UPS account number |
| Manifest Partner Id | Your EasyPost Carrier Account ID (ca_xxxxxxxxxx) |
| Manifest Partner Credentials | Your EasyPost API Key |
💡 Pro Tip: Once the parcel account is created, run the Lookup Parcel Rates process to confirm you're able to pull rates for UPS SurePost before using it in live orders.
How Infoplus Sets Default Parcel Accounts:
Infoplus uses a structured process to identify the default parcel account that should be used based on the level of importance.
Order Source:
When an order comes into the system, the Order Source is the first touch to establish what default parcel account needs to be applied. This is the highest level for assigning the Parcel Account.
Line of Business:
The next level is the Line of Business. The LOB owns the order and will apply its default parcel account if there is no Order Source Parcel Account applied.
Warehouse:
Last is the Warehouse default parcel account. If the system does not see a default parcel account tied to the Order Source or to the Line of Business, then the Warehouse default parcel account acts as a catch-all and assigns its default parcel account to the order.
Example: If you have a specific default parcel account set for the warehouse and a different default parcel account set for the order source, Infoplus will use the default parcel account assigned to the order source for that order, because it overrides the warehouse's default parcel account.
This allows the client to dictate which parcel accounts are used in the different scenarios to ship these products.
Here is a diagram of the hierarchy Infoplus uses to choose which default parcel account to use:
-1.png?width=401&height=440&name=image%20(3)-1.png)
- LOB (Line of Business): If you do select a LOB to assign this parcel account to, you will restrict this parcel account to only be used for the selected Line of Business. You can only specify one LOB per parcel account. However, You can create the same parcel account multiple times and assign it to other LOBs
Note: If you create a parcel account and assign an LOB to the parcel account record, DO NOT add the Parcel Account as a default to the Line of Business record, as this will produce the following error:
Error: "The selected LOB is not allowed because a different LOB is already assigned to a different Parcel Account"
To move past this error, you must remove the LOB value from the Parcel Account record. This will allow you to edit and save changes to the Parcel Account.
At that point, a user should set the default on the LOB record for this Carrier.
Note: If, in the process of trying to ship an order, the system generates the following error: "The Parcel Account (ID#) for this Order is not properly configured. It is missing the Manifest System Association. Please contact Customer Support." This issue stems from the system not having a parcel account attached to one of the above options.
- Order Source: Restrict to only use this Parcel Account for a certain order source. You must select an LOB in order to select an order source.

Pro Tip: Once the Parcel Account is created, it is suggested, at a minimum, run the Lookup Parcel Rate process to confirm you are able to pull rates. Another way to test is to create a test order and ship it out. If you are using a Production API Key, make sure to void the label after.
How to Edit an Existing Parcel Account
You can edit an existing parcel account at any time.
- Go to the Parcel Account table and click on a specific Parcel Account, then click Edit:
- Make the desired changes and click Save.
What to Do if You Have Multiple Parcel Accounts for the Same Carrier
If you have multiple Parcel Accounts for the same Carrier (eg 2 UPS accounts) you will need to assign an override for the additional accounts. You can override via Order Source, Line of Business, or Warehouse.
- Order Source -- override set up in order source table
- Line of Business -- override set up on parcel account table
- Warehouse -- override set up in warehouse table
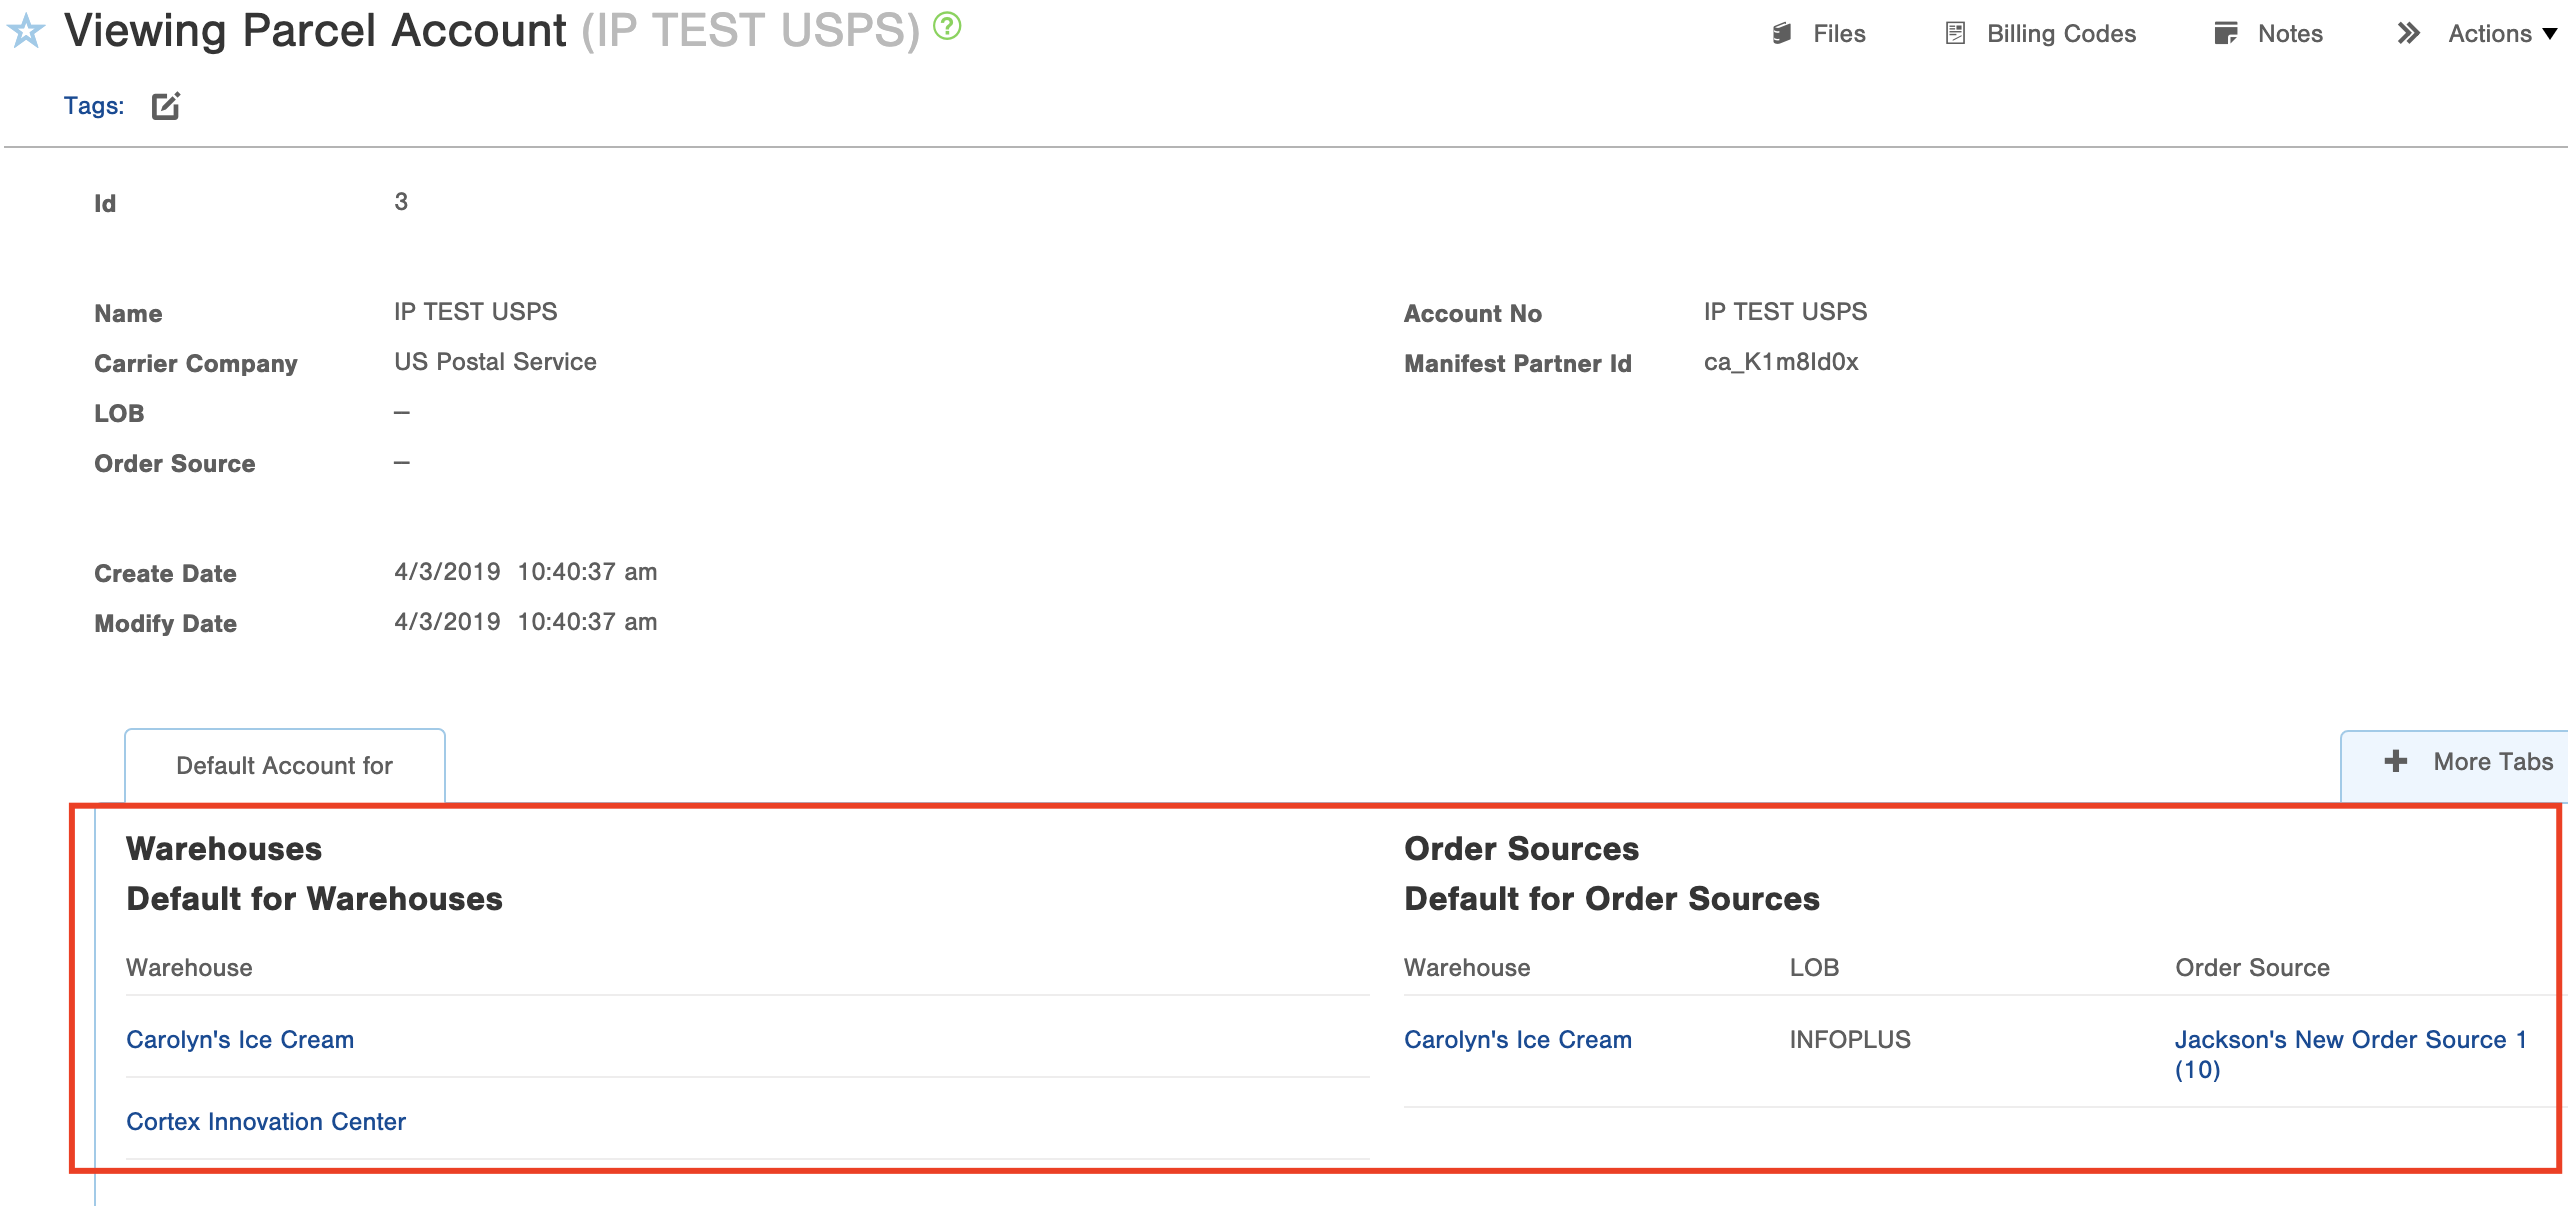
Pro Tip: To view your order, warehouse, and LOB overrides for Parcel Accounts, go to the Parcel Account Table, click on the specific parcel account, and scroll to the bottom to see what overrides are currently set up and active for that account:
What if I Ship Orders via a Third Party Parcel Account?
If you are a 3PL and utilize parcel accounts for third-party billing, you can set up each client's parcel account in Infoplus. See: Create a Third-Party Parcel Account to learn how to implement third-party parcel accounts. 