Using the Order table, you can create, edit, and delete orders. You can do this one at a time (see instructions below), but you can also bulk load orders and bulk edit orders.
For information on the fields in an Order record, see View an Order.
Create an Order
-
Access the "Order" table. Two ways:
-
From the Dashboard: Click the “Account Management” tab, click the “Order” App, then click the “Order” Table.
-
From the Quick Actions shortcut: Press a dot (period) on your keyboard, then select “Order” from the list of Quick Actions.
-
-
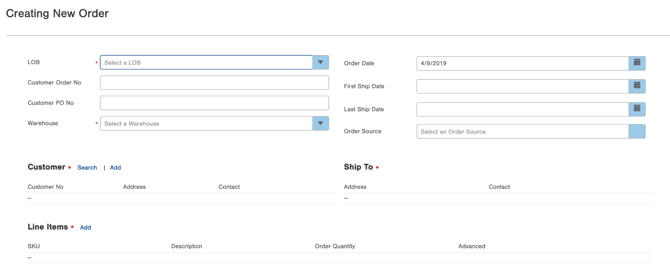
Click the Create New button in the top right. The "Creating New Order" screen appears.
-
Fill out at least the required fields.
-
Select a Line of Business in the LOB field.
-
(Optional) Enter a Customer Order No. This is typically used when referencing an order number using a 3rd party ordering system.
-
(Optional) Enter a Customer PO No. This is typically used when referencing a Purchase Order number from a third party ordering system, such as Amazon.
-
Select a Warehouse.
-
Select an Order Date, if different from the current date which is the default
-
(Optional) Enter a First Ship Date. This is the first date on which the order can be shipped. You are indicating to not ship before this date. This information can help prioritize shipments, show what needs to ship on a given day, and allow measuring of performance against an SLA (Service Level Agreement), if applicable. For example, measure performance against an SLA allowing 1 day to ship an order. This information is especially helpful for companies with multiple LOBs (Lines of Business) that have different SLAs based on the client.
-
(Optional) Enter a Last Ship Date. This is the last date on which the order can be shipped. You are indicating to not ship after this date.
-
(Optional) Select an Order Source. This tracks where an order originated from.
-
-
In the Customer section of the window, you can search for an existing customer by clicking the Search link, or create a new customer by clicking the Add link.
NOTE: Adding a customer creates a Customer record in Infoplus.
-
If searching for a customer, an additional window will display with a list of customers in the system. Use the search area at the top of the window to find the customer. Once found, click on the customer record, and then click OK.
-
If adding a customer, an additional window will display requesting customer information. Fill in the customer information and click OK. A new Customer record will be added to Infoplus and the customer will display in the Order.
-
-
Once you have selected a customer, the customer record will appear in the Customer and Ship To sections of the window. A
 icon will appear to the right of the customer record that allows you to edit or delete the customer.
NOTE: Editing a customer from within the Order also edits the Customer record, not just the customer information within the Order. But deleting a customer from within an order just removes the customer from the order. It does not delete the Customer record. -
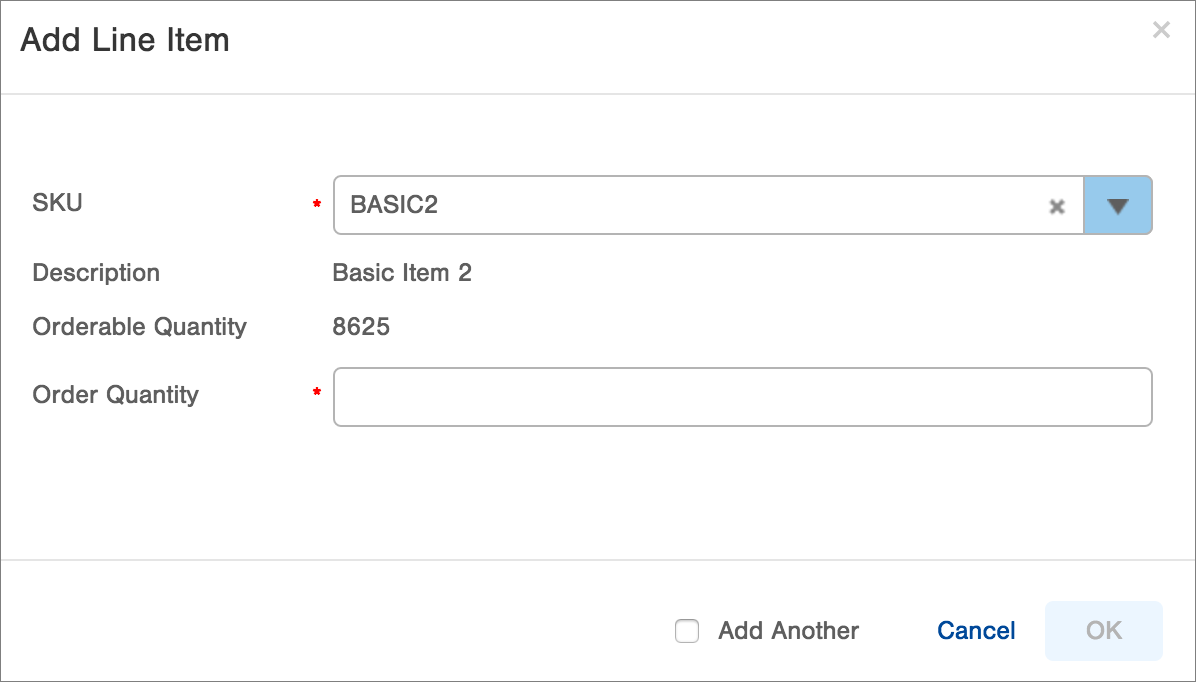
In the Line Items section of the window, add Line Items (SKUs) to the order by clicking the Add link. The Add Line Item window appears.
-
Select the SKU to be added to the order.
NOTE: You can begin typing the SKU to jump to specific line items. -
Infoplus will fill in some additional information for you. The Description helps you check that that you have selected the correct SKU. The Orderable Quantity shows you how many of this item is currently available to be shipped. NOTE: If the orderable quantity is showing up as a negative it's based on adjustments, receipts, and fulfillments, see what activity has occurred on the Item Activity table.
-
Enter the Quantity to be ordered.
NOTE: If the Quantity is more than the Orderable Quantity during fulfillment, a backorder will be generated at that time if both of the following conditions are true:
- the Item has been set to allow back ordering, and
- in the Shipping and Handling section of the order, Ship Complete is set to False.
Otherwise, attempting to fulfill the order will set the Shipped Qty to “0” and the Carrier to “NO SHIP”.
See Release Orders from Back Order Status for more information -
If you want to continue to add other items select the "Add Another" checkbox. When finished adding line items, uncheck the "Add Another" box.
-
Click OK in the Add Line Item window.
-
After adding Line Items, they will display in the Line Items section. A
 icon will appear to the right of each line item that allows you to edit or delete the item.
 -
In the Shipping section, whatever you select in the Shipping Method field impacts other fields.
Important Note: Carrier and Need by Date are the best options for shipping methods. The third option, Deliver on Date is designed with a unique legacy client in mind and is not recommended for general Infoplus users.
Under Shipping, the Shipping Method drop-down has three options:
1. Carrier: Infoplus will automatically select the default Carrier and Service Type for the selected customer. You can override these selections if needed.
2. Need by Date: Infoplus will automatically choose a Carrier and Service Type appropriate for the target delivery date. When selected, an additional drop-down will appear asking for what specific date the order is needed.
3. Deliver on Date: Infoplus will automatically choose a Carrier and Service Type appropriate for the target delivery date. When selected, two additional drop-downs will appear: "Deliver on Date" and "Ship Via".
NOTE: If "Deliver on Date" is selected, the Order Date may change to accommodate the fulfillment process and ensure the order is delivered at the selected time.
About 'Ship Via' and 'Deliver on Date':
The Deliver on Date option is designed with a few unique legacy clients in mind. Therefore, this option might not work well for most Infoplus users.
When Deliver by Date is selected, the Carrier that complies with your Ship Via selection and will deliver your order by the chosen date will automatically be selected. Infoplus will also automatically select an Order Date that will allow the order to fulfill and ship within the timeframe necessary to be delivered on the specified date.
Non-Legacy clients that select Deliver on Date can expect to see this error unless they utilize the ship-via of 'Will Call' or 'LTL
Note: Once you save the Order, a "Pre-Allocation Estimated Weight" field will appear in the Order record showing the weight of the order. This information may be helpful when considering fulfillment processing or reporting prior to processing (e.g. to select the appropriate carrier for the Order prior to processing). Be aware that if you edit the order, the "Pre-Allocation Estimated Weight" will update as well.
Order Dates and What They Mean
Date Value What it Means in Infoplus Notes Create Date This is a stationary field that never changes and indicates when an order was added to Infoplus Order Date This field can change based on different scenarios. For example, if a shopping cart connection accepted the order on 1/1/2021 but sent it to Infoplus on 1/2/2021, then the Order Date would be 1/2/2021. It can also be updated due to SLAs and other scenarios - It is normal for the Order Date to change after an order has shipped.
- Users wanting to run reports off of when an order was first created should use the Create Date column, which is a constant fixed value.
Shipping Label Date When the parcel label has been created for the Order Shipped Date When the Order Status moved from Processed to Shipped Modify Date Last time the order record was changed Note: Sometimes a shopping cart connection sends in orders later and you may want to capture when that order was first placed in the shopping cart. We recommend then creating a script on the Shopping Cart Connection to capture that initial order date and inserting it into a Custom Field.
-
Make the necessary selections in the remaining Shipping fields.
-
If you work with a Third Party Parcel Account (to execute third-party billing for orders), select the account.
-
Enter a Priority Code if desired. (A code of 10 considers all orders the same priority. If you need an order to take priority of inventory that is currently in stock, you can increase the product
-
code to 20, 30, 40, etc..)
-
-
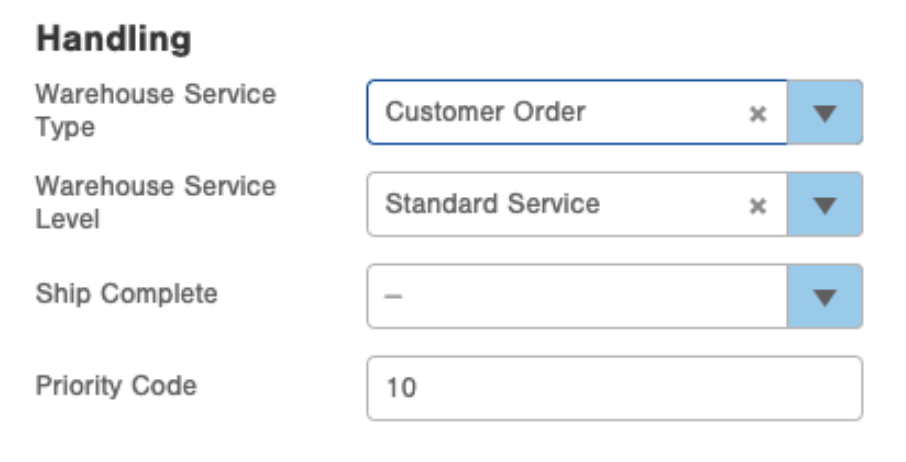
In the Handling section:
-
Warehouse Service Type specifies what kind of service your warehouse is going to perform in the process of Fulfilling the order. It is a similar in concept to an "Order Type".
Clients with access to the Insights module, can define some their own Service Types. One use case here is to help distinguish different "production lines" in your warehouse - for example, B2C/eCommerce orders vs. Big-Box Retail orders, vs. LTL orders.
-
Infoplus also has some core/built-in Service Types, for orders that it creates (and some that it cares about, such as Transfers). Specifically, these are: Outside Vendor, Kit, Job, and a few other less-likely-to-happen to non-legacy clients.
-
Warehouse Service Level specifies the "expediency" of the order, for the purposes of warehouse handling. By default, we'll have 2 options for this field: Standard Service, and Rush. Note that legacy clients have 2 variants of Rush (Same-day and Next-day).
-
Select True or False in the Ship Complete field. (If this field is set to True, the order will not fulfill unless all items are available. If set to False and the item has been set to allow backordering, the order will ship what is available and place the other items on back order.)
-
Enter a Priority Code if desired. (A code of 10 considers all orders the same priority. If you need an order to take priority of inventory that is currently in stock, you can increase the product code to 20, 30, 40, etc..)
-
-
In the Tabs at the bottom of the window (i.e., Alcohol, Charges, Details, Messages, Templates), enter information pertaining to your order.
NOTE: In the Templates tab, you can select an Order Confirmation and/or a Shipping Confirmation Email Template to be used for the order. See Create Email Confirmation Template for information on creating these templates. -
When finished creating the order, click Save. The Order is saved and is in a status of "On Order."
How to Edit an Order
NOTE: The instructions below are to edit one order at a time when an Order is in "On Order" status. To edit multiple orders at once, see Bulk Edit Orders. To edit a "Processed" or "Shipped" order, see Edit Processed or Shipped Orders.
-
Access the "Order" table. (See instructions above.)
-
Click on the Order you want to edit. The Order record will open.
-
Click the Edit button in the bottom right.
-
Make the necessary edits and click Save.
How to Delete an Order:
NOTE: You can not delete a "Processed" or "Shipped" order.
-
Access the "Order" table. (See instructions above.)
-
Click on the Order you want to delete. The Order record will open.
-
Click the Actions button and select Delete.
-
Access the "Customer" Table. See instructions above.
-
Click OK to confirm the deletion. The Customer will be deleted.
Delete "Processed" Order:
-
Access the "Order" table. (See instructions above.)
-
Click on the Order you want to delete. The Order record will open.
-
Click the Actions button and select "Unfulfill Orders"
-
The order will go back to 'On Order' status
-
Click the Actions button and select Delete.
-
Access the "Customer" Table. See instructions above.
-
Click OK to confirm the deletion. The Customer will be deleted.
Frequently Asked Questions
-
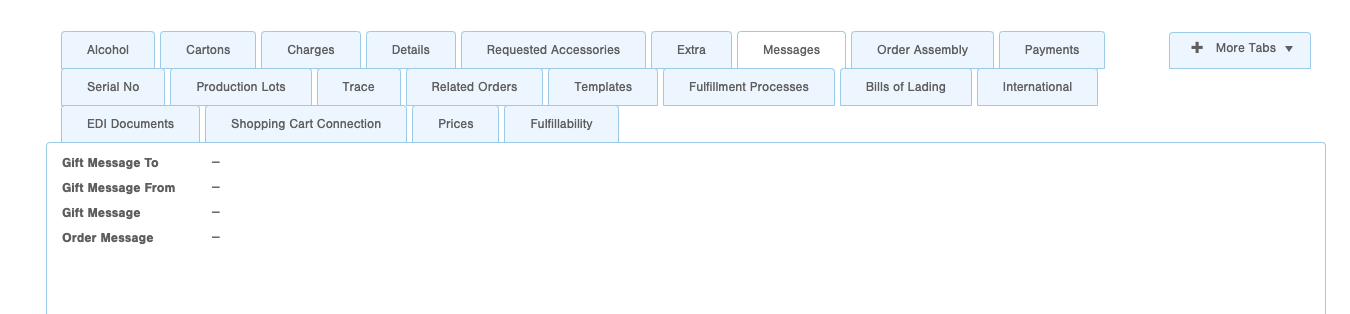
What are the character limits for Gift Messages in Orders?
| Field Name | Character Limit |
| Gift Message To | 100 |
| Gift Message From | 100 |
| Gift Message | 250 |
| Order Message |
250 |