Get Started Using Your Live Site
Before using your Live Site, make sure you review the Overview of Your Test and Live Sites for important considerations.
Take a Tour
If you haven't already, we suggest getting familiar with Infoplus navigation and basic searching. Take a quick tour of the Infoplus navigation.
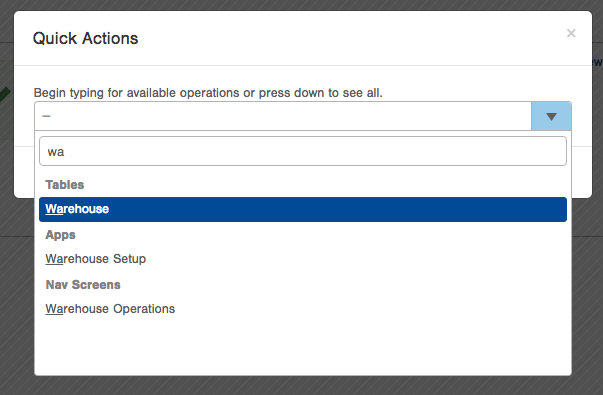
Here's a tip: The (.) dot key on your keyboard lets you type a keyword and go directly to that application in Infoplus. Called "Quick Actions", it's a great way to get where you're going fast. Learn tips like this, and all about how to navigate Infoplus, by viewing this Video: Get a Quick Overview of Infoplus.
Key steps to learning using your Live Site
This important step is the foundation for others that follow. Infoplus has set up your warehouse address for you. Now it’s time to structure your warehouse, such as multiple buildings, aisles, bays, etc. Structure your warehouse with as much or as little detail as you’d like. We’re here to help, so don’t hesitate to reach out. Be sure to practice using your Test Site first.
See Considerations Before Creating Your Warehouse, then go to Create / Edit a Warehouse to get started.
2. Create or load warehouse locations
Once you have established the structure for your warehouse, it’s time to create locations. You can do this two ways:
- Create each individually, or
- Load them using the Location Builder
A location is a specific place used to put away, pick, and replenish items that you stock in your warehouse.
See the Locations Overview to get started.
3. Create or load items (SKUs) in your warehouse
Item records in Infoplus indicate details about the products you sell such as SKU number, dimensions, units per wrap, etc. Create your items in Infoplus or, even better, load them in bulk. A spreadsheet template for bulk loading items is attached below.
Your Items need a place to live. Item records can be brought into Infoplus independent of your warehouse setup. However, you’ll want to be sure your warehouse, locations, and items are loaded in Infoplus before you receive your goods (inventory) into your warehouse.
See Create Items or Bulk Load Items to get started.
4. Create or load vendors
Manage your vendors in Infoplus. Vendors are required to be loaded into Infoplus in order to use “Quick Receipts” in your next step. You can create vendors by entering new vendors individually or, better, bulk loading them from a spreadsheet.
See Create Vendors to get started.
5. Receive your goods
Once you have your warehouse, locations, items, and vendors loaded into Infoplus, you’re ready to receive items into your warehouse.
"Quick Receipts" is a two-step tool to quickly receive products into your warehouse and set up your beginning inventory in Infoplus. Create Quick Receipt records for one item at a time or through a bulk load process. After the initial upload of receipts through the "Quick Receipts" process, use the standard process of receiving inventory against an Advanced Shipping Notification/PO.
See Quick Receipts and the Receiving Overview.
6. Set up your parcel account
To connect your shipping accounts to carriers in Infoplus (i.e., USPS, UPS, FedEx, etc.), Infoplus will work with you to create your Parcel Accounts. Due to the lead time to establish these accounts, it is recommended that we schedule this early in the process.
NOTE: If you ship via Third Party Parcel Accounts, those accounts will be created separately. In a future step, we'll show you how to connect your printers and scales as well.
Contact us to schedule your Parcel Account setup either by coordinating with our account team or contacting Infoplus Support.
7. Create packing slips for orders
Information on a Packing Slip comes from the Order record (i.e. Shipping Address and SKU information). A Packing Slip Template specifies the layout of the packing slip and determines which information from the Order record to display. A default packing slip will be provided for you, but you can customize it or create your own.
See the Overview of Packing Slips.
8. Create an order
Create or load at least one live order to give Infoplus a true test in the next step. Here you can also learn about loading bulk orders for future use. A spreadsheet template for bulk loading orders is attached below.
NOTE: In a future step, we'll show you how to integrate your orders through your shopping cart.
See Create / Edit Orders to get started.
9. Process your first order
Once your parcel account and packing slip templates are set up, and you have an order loaded in Infoplus, you’re all set to run fulfillment and ship your first order. Consider shipping the order to yourself!
You can also learn more about setting up fulfillment plans for future use.
See Fulfillment Overview to get started.
Ready to keep going?
Congrats on getting started in Infoplus! There’s still a lot to learn to leverage all the features that Infoplus has to offer. See Next Steps to Continue Learning Infoplus.